
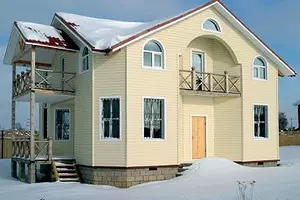
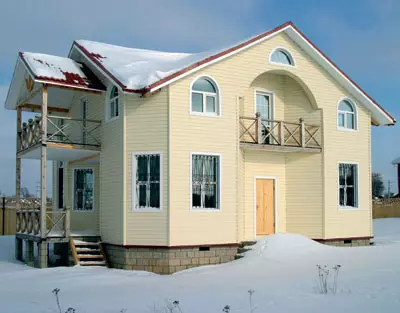
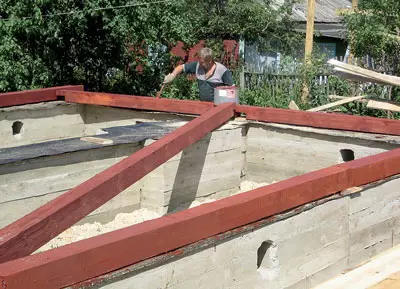
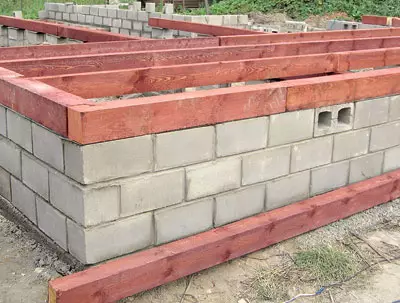
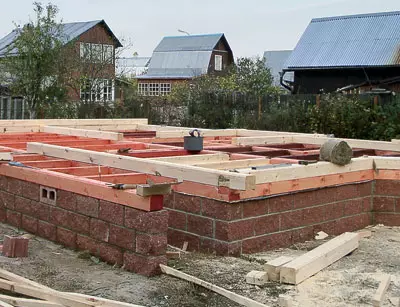
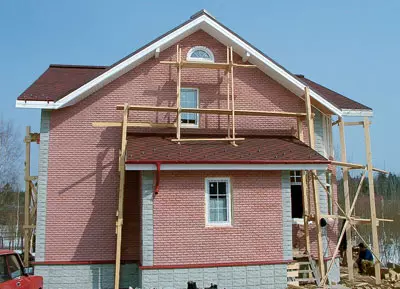
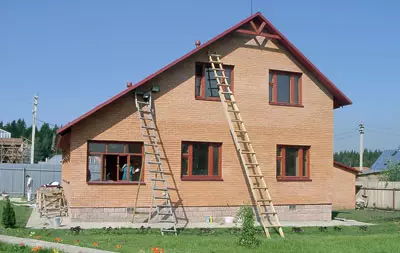
An embodiment of a two-story house (148 m2) from a bar is the most common, unpainted and non-corrugated. The main stages of construction.
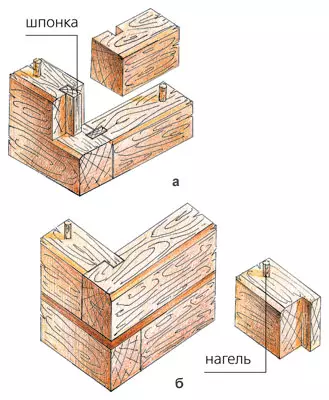
A- on the knaps;
B- "Fading with indigenous spike"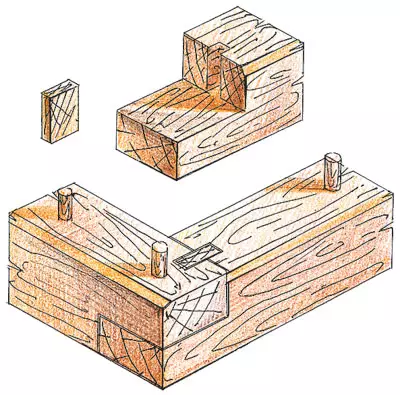
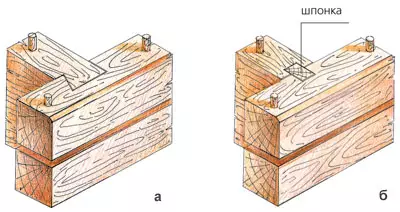
A- Womb on half of the width of a bar "Semi-Survene"
(has the shape of halves of a swallow tail);
B- on the swords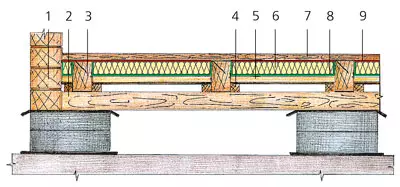
1st wall of timber;
2-chamber;
3 laga floor;
4-string cranial 5050mm;
5-black floor;
6- insulation;
7-tipped floor board;
8-pergamine;
9- "isosun"


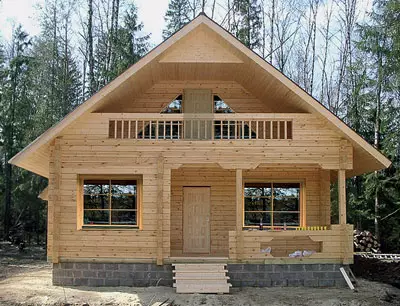
We continue the conversation on the topic of dacha construction. Watht times we will discuss the construction of houses from the most ordinary, unprofilated and non-corporal.
Conditionally summer houses from wood are divided into two categories. The first are those in which you can settle immediately at the end of the construction carried out in one stage. These are the buildings framework, as well as those erected from wood, which is dried in artificial conditions. The second category includes houses built at least in two stages. First build the box (it is set about the year), and then perform the final finish. We category includes buildings from the usual (non-corrupt and unprofilated) venue of natural humidity. Ineapply on all the convenience of frame structures, the bars are built 3-4 times more. What are they so attractive?
Why choose a bar?
For a frame house, in which you can immediately enter, it is necessary to pay the full amount simultaneously. Construction of a timber dried in artificial conditions (it costs such a material about B2Read more expensive than having natural humidity) requires the implementation of the same condition. Avota house from a bar with natural humidity does not oblige this. As already mentioned, its construction is divided into several stages, and their payment is made at different times. There are at least two such steps, but if necessary (primarily financial) can be more. And the time between the stages can be stretched, conforming to all with the same finances. And the cost of 1m2 (without decoration) is almost "modest" - 6000-7500 rub.
The dasch of non-economic factors is primarily the unusual of the framework technology. Frames with racks every 40 cm, covered on both sides with modern sheet materials (OSB plates, plasterboard IT.) and filled with a thick layer of the insulation, does not seem reliable to the domestic consumer. It is well illustrated by two ways quite common in the environment of potential buyers: "Any hooligan will prolomit such a wall" and "I do not want to live in an imported box from under bananas." It is not even able to dispel doubt that the frame houses withstand an earthquake of up to 9 points (lightweight construction of minority).
What to say, our fellow citizens are confident that the walls of the house should be massive - better from the thick log, and if not the log, so from the bar. After all, structures from this material are not inferior to log: they are comfortable and environmentally friendly, and from the point of view of further finish even more technologically. Athena on the example of country houses offered by the Moscow ABS-Stroy Moscow firm, we will discuss in detail about the existing methods and receptions of construction from the bar.
The behavior of the foundation in the brunched ground
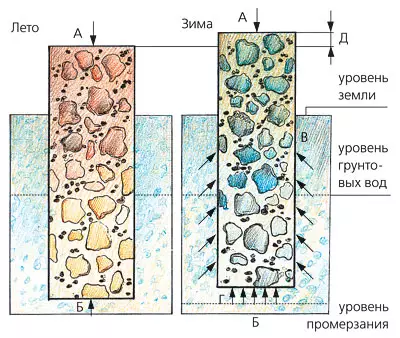
After thawing the soil, the foundation can either return to the previous place at all, or return unevenly. The result is likely to deformation, and its own, and resting on it. So that this does not happen, the basement sole must be placed either below the level of primeros of the soil (in this case it does not experience the pressure of the soils of the soil below), or at such a depth, where the powered forces are equalized by the load from the structure (the so-called fine-breed foundation). In love, the sole must be based on a sandy pillow. As it is clear: clay bunched soil is cleaned and replaced with sand, which is not exhausted.
To reduce the harmful effects of the action of the poverty forces (Vig) for the foundations blown below the limits below, it is recommended:
perform them from reinforced concrete;
expand the base of the foundation;
Making the walls are not vertical, but narrowing up.
Zero cycle
Brous houses are usually built on bar, slab or ribbon foundations.Stated foundations. The simplest is considered the foundation called "floating columns" (it said in detail about it in the article "Spiers on the towers"). The bang of the columns can be attributed to both the pile foundation, the main element of which, manufactured from different materials. For this purpose, asbetic pipes with a diameter of 150mm are usually used for this, they are inserted into the hole in the ground made by the brown. Proudly placed reinforcement, then filled with a concrete mixture. The lack of such a foundation is obvious: each column "walks in itself."
More reliable another option - "Ruralsk on the columns". These are piles, rigidly connected with each other in the above-ground part by reinforced concrete ribbon. Its cross section is from 300150 to 700500mm, the distance between the column is not more than 3m. Scarlet raised over the soil at least 50mm, and the space under it falls asleep with sand or clay. Cost 1Pog.m. Such a design is from 2000 rubles. It should be noted that the pile-growth-rigor foundations have proven themselves on weakness and loose soils (for example, peatlands) - piles in this case are plunged so that they reached the solid soil layer.
Slab foundation. This is a reinforced concrete plate on which the building will rely on all its walls. Such foundations are ideal for bunching soils with a high level of groundwater, since they are not afraid of their vertical and horizontal movements. Noetie foundations of fairly roads (1m2- from 3000rub.), Because they require a significant consumption of concrete and reinforcement.
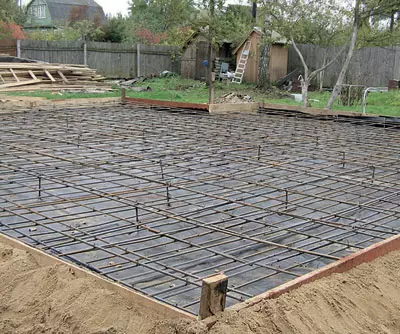
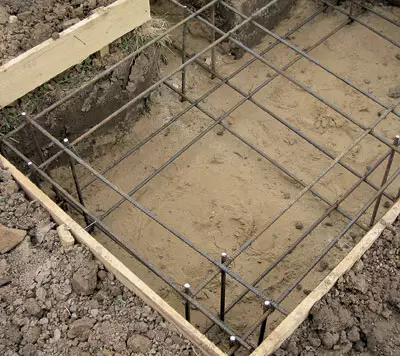
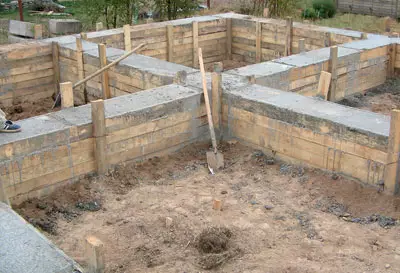
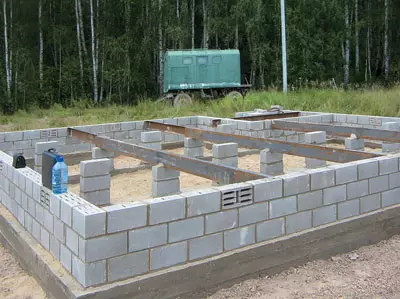
Ribbon foundations. This is called reinforced concrete structures having the same cross-sectional shape (tape) and under external, and under internal carrier walls. Punching soils bloated below the friction dots. Ribbon foundations are constructed only under heavy buildings. Light brusade houses are more likely to be built on the so-called fine-breeding belt basements (their lower support plane is located at a depth of 400-700mm). They are rather cheap (1pog.m- from 1300 rubles) and reliable, because they are a rigid horizontal frame that redistributing uneven deformations of the base.
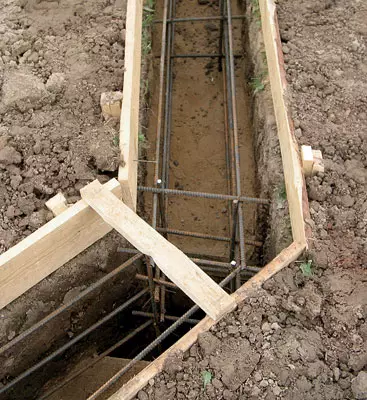
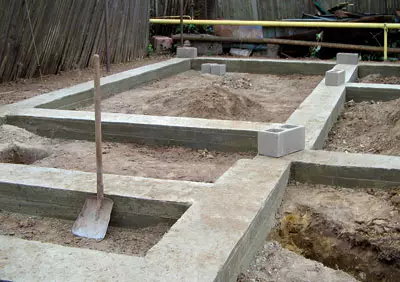
To bookmark such foundations, they dig a trench with a depth of 900mm and fall asleep with sand at 300mm. The resulting sand pillow is thoroughly trambed and spilled by water. Then the reinforced concrete tape section of 600400mm is made, and after the concrete is frozen, they lay a narrower tape from sandcate blocks. It is either the usual (gray) smooth blocks, or color, and more, which are like that, the front side of which mimics the rootstone (thanks to this foundation and without additional finishes, acquires a aesthetic look). A ribbon design can be constructed even in winter, of course, if special additives are introduced into concrete and mortar for masonry.
Professionals are recommended to lay such a tape both under the bearing walls and under all the protruding parts of the house, for example under the porch. Soda side, it increases the cost of construction - the creation of the tape under the porch will cost 3200 rubles. (concrete- 2000 rubles, work- 1200rub.). But such a porch is guaranteed not to behave as an independent element of the design (as it happens when installing on the columns) and in the end it will not "break away" from the house.
What timing to choose?
On sale you can meet a natural humidity bar (more about its properties and behavior, the conversation was in the article "Dacha in 5 days") of the following sections: 120120, 140140, 150100, 150150, 180180, 200150, 200200mm. Frequently, the time is most widely used by the timing of 150100 and 150150mm (price 1m3- 3100rub.), And for beams of overlaps and rafting systems - 200150mm. The material of such sizes is much more expensive (1m3- from 3700 rubles), since it is made from selected round.
Annede Popular Bar 100100mm is now considered unprofitable. First, the wall thickness of 100mm is much colder than 150 mm, that is, it will have to be insulated (this, by the way, should be thought of in advance). Secondly, at the same value of the bar himself, the laboriousness of the construction of walls is noticeably increased: the number of crowns stacked on the wall increases by 1.5 times, and, therefore, the number of seams that will have to be caught at the same time. Moreover, it should be borne in mind that meal is one of the most expensive operations (1Pog. M- from 30 rubles), and its highly qualified specialists perform.
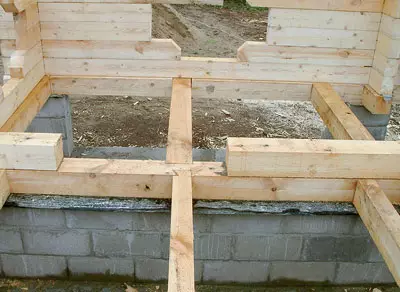
When choosing a bar, you should also not forget that its cross section significantly limits the length of the wall that does not require the device of the so-called rigidity (dressings of the outer wall with internal). So that the construction was durable and with time did not acquire a barrel-shaped shape, for a bar, a cross section of 100100mm dressing should be arranged every 4m (the width of the room!), And for a bar 150150mm- through 6m.
Thermal insulation properties of brusal walls depending on the thickness of the timber and insulation
| Wall thickness, mm | The heat transfer resistance of the wall R0, M2C / W | The thickness of the insulation layer, mm | Total heat transfer resistance R0, M2S / W |
|---|---|---|---|
| 100 | 0,7 | fifty100 | 1,8. 3,2 |
| 150. | 0.98 | fifty 100 | 2,3. 3.5 |
| 200. | 1.27 | fifty 100 | 2.5 3.8. |
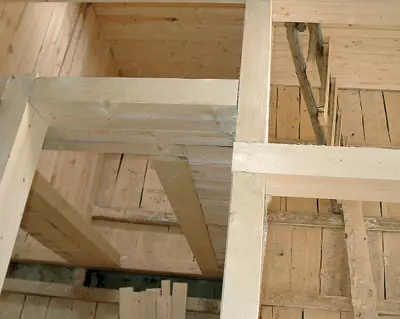
Technology assembling walls
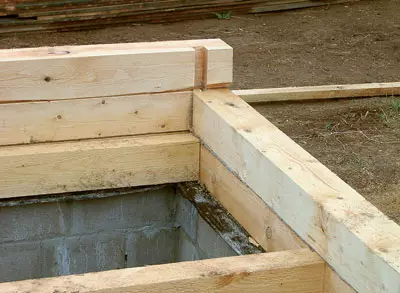
The walls from the bar are usually constructed right in place (about exceptions to this rules, which are erected by Prefabricated Houses, we told in the article "Cottage for 5 days"). The gifts are used by two methods of connecting the corners - "in the paw" and "in the edge". The difference between them lies in the fact that the lamp is connected to the corner in the paw (the ends do not go beyond the outer plane of the walls), and when cabling "in the edge" - with the residue (the ends of the timber are released for the outer plane of the walls). The selection of this or that method depends not only on the architecture of the building and personal addictions of the customer, but first of all, from how and what is expected to separate and whether it will be warmed. If the walls are subsequently trimmed with anything and the more insulating, then only the cutting "in the paw" will be applicable.
The assembly of walls begin with an installation on the foundation of the strapping crown, connected on the corners "in Polterev" regardless of the selected method of bonding corners at the subsequent crowns. After bonding the corners, the seal is put on the strapping crown, then the bars of the next crown. To reduce the injection of angles in the fires collected "in the paw", use different connectivity options: on wooden veneers, "Fading with a native spike".
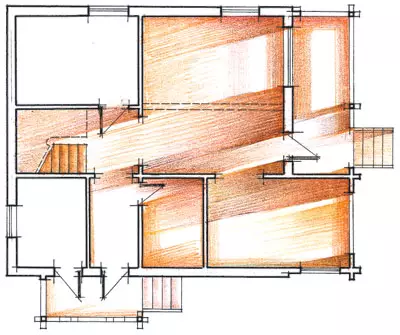
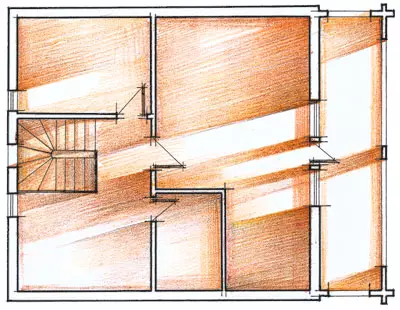
The walls of the first floor are asserted to a height of 2.4-3m (it is laid in the project). After that, the overlaps of the first floor are mounted and proceed to the construction of the second floor or attic. Their walls can be made either in the framework, or also in the brusade - it all depends on the wishes of the future owner.
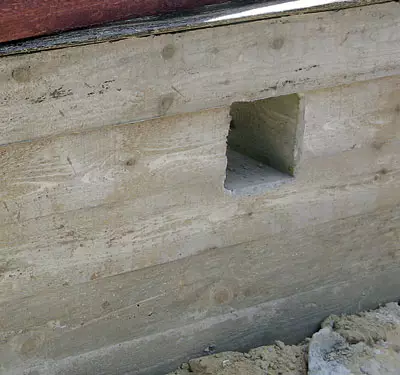
Seals and longitudinal cunning of the crowns. On this issue it makes sense to stop in more detail. Let's start with the fact that the horizontal junctions of the bar behave somewhat differently, rather than the joints of the logs, and require more attention to themselves. This is explained by the fact that when laying the bars on each other, the seam is obtained with a flat (horizontal), in contrast to the groove seam in a log cabin. It is clear that the flat seam wets under the rain much stronger. Therefore, if the bar walls are not supposed to be further sowing, to improve the outflow of water on the upper outer edge of the bar, it should be made to the assembly (from 1010 to 2020mm).
Now about seals. As with the construction of a log, you can use the pass, moss, felt and hemp. But it is better to apply more modern material-flange cloth. It is sold in rolls (5mm thickness), which are cut into the tape the required width. The use of the canvas ensures the uniform distribution of the seal in the seam.
Braided. They are needed to connect bars with each other, thereby preventing their twisting. To do this, with a step of 30-40cm, three bar are drilled and inserted into the hole without an effort (!) Wooden bent (better birch or oak) with a diameter of 3-4 cm. In line and height of the wall such holes alternate in a checker order. Wooden bells will not allow the bars to twist, but their other, unfortunately, will not fit. Therefore, the upper, low-loaded crowns are sometimes strung out in the vertical plane.
Another option is metallic. They are made from the pipe or reinforcement bar. Begroen from the pipe behave no better than wooden. From the reinforcement (10mm diameter) work as nails, only more powerful. True, they are not suiced, because they are made to order. Their more disadvantage: when the structure is shrinking, the bars may hang on the corrugated surface (they move relative to brazen downwards from top to bottom), which will cause the appearance of large gaps. That is why many firms replaced with nails with a length of 250-300mm. Their use allows, first, to compensate for the deviations of the geometry of BRUSEV due to tightening among themselves and receive more dense seams. Secondly, the smooth surface of the nails does not interfere with the vertical movement of the bar during shrinkage. So that the upper crowns do not hang on the hats, the timber is made to a depth of 3-4cm, after which the jogged nail is completely 2-3 cm with "Dobobunik". As a result, during the shrinkage of the bar, the rissed hat remains in the drilled hole and does not lift the upper timber. This technology allows you to quickly withdraw a large house (from 88 to 1012m), which has quite extended sections of walls and a plurality of simpleness, to a single level. We manage to do it quickly on wooden brazing, only in small buildings.
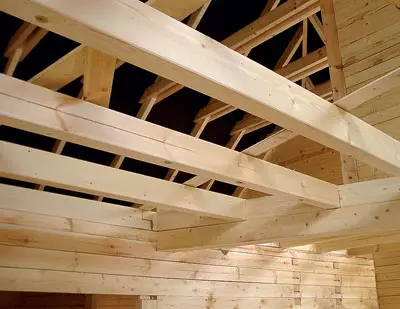
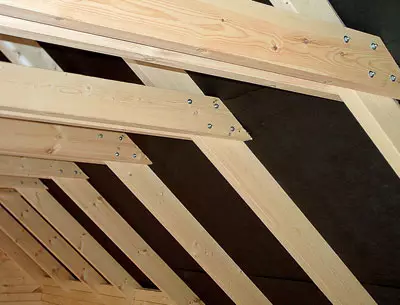
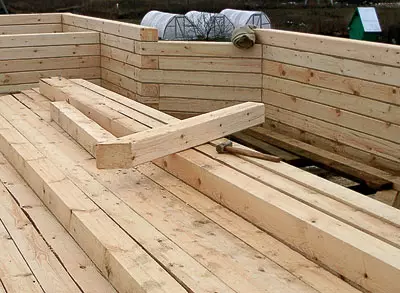
Laying floors
The floors in the country house, even if it is used only in the summer, should be done double, with insulation of the insulation layer will play the role of sound insulation. Pagboard lag is better to use a timing segment 150100mm, stacked on a narrow end with a step of no more than 70 cm. If the lags overlap the distance more than 3m, then in the "span" the so-called email should be laid (the 200150mm bar, installed on a narrow end), otherwise the lags can be fed.Typically, to create a draft floor to lags are lagged from the bottom of the edged boards. But this option fastening is dangerous in that when operating, the design can get over and the boards will simply break off. Therefore, it is preferable to lagged a cranial bar on the lower edge, and the cuts of the edged board are put into pockets between the lags (a similar variant of the creation of the draft floor is shown in the article "Cottage for 5 days"). Further, these pockets are placed in a layer of moisture insulating material (most often pergamine), and on a layer of mineral wool insulation (sawdust was previously used, clamzit IT.P.), which is covered with steam insulation from above (for example, "Izospan in"). Then the floor from the trench-made flooring is laid, the thickness of which depends on the step of the lag. For example, in step 70cm, you should use a 40mm thick board, and with a step 40cm-thickness 30mm.
In order to lay it? Usually, the finishing floor is advised to mount at the second stage of construction - with the final finishing of the house. But you can select a gender board of natural humidity and at the first stage. While the house will give a shrinkage, it will dry. When laying each board, it is not necessary to none, it is enough to fasten each fifth, the rest will be kept at the expense of the tongue. During the final finishes (after a year), the floor is tightened, the boards are raised and re-mounted without cracks, and then cycle. If we consider that 1m3 dry genital boards costs 7000-8000 rubles., And 1m3 of natural humidity boards - 3400rub., Saving even with double labor costs, it turns out to be significant, about 2500 rubles. with 1m3.
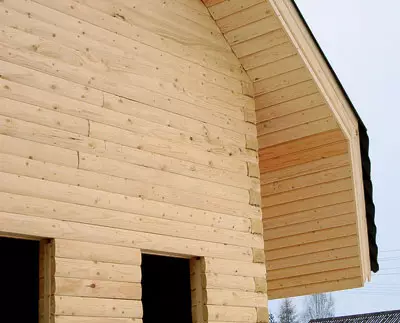
Bloofing
In most cases, the second floor of a cottage household room, requiring a warmed roof (see the article "with a view of the sky" in more detail. When it is created, you can go a few ways. The path is the first: in the first year of construction to build a temporary frontal roof, and at the second stage, replace it with constant. Way of the second: In the first year, only the roofing material and a layering insulation lying under it, and the installation of the insulation and vaporizolation to leave for the future. The third path: immediately mount the whole roofing "pie" entirely: vapor and moisture insulation, insulation and roofing material. The third path, although it requires high costs at the first stage of construction, it turns out to be economically most profitable. After all, the rubberoid will have to be thrown away. Mounting the insulation and vaporizolation under the already installed roof is not always convenient, and therefore these works will cost more (by 5-20%), and to ensure their quality, for example, in low and hard-to-reach zones, will be difficult. In general, which of the three ways to choose each owner of the future home decides itself.
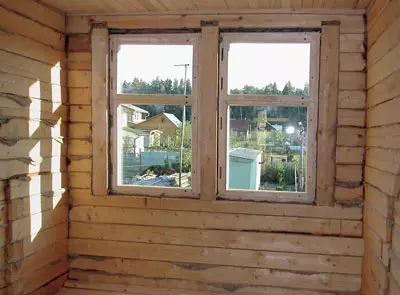
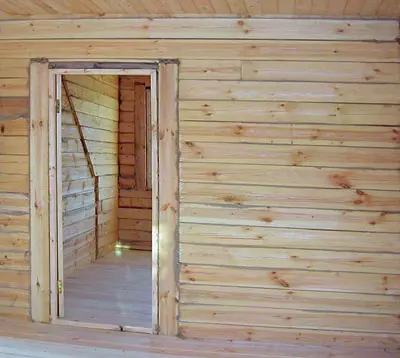
Installation of doors and windows
Again, you have to choose one of two options: whether it is all right or wait for the start of the second stage. It is better to go on the second path. We will be able to skip the openings in the openings when assembling the walls, thanks to which the log house will settle more evenly. On this, you wanted you do not want, the first stage of construction, the brusade house must give shrinkage.Control over construction
The most reliable way to look after the construction of the long-awaited house, come to the construction site personally, several times a week. But all of us are busy ... Is there any other ways to control? Now a rather original practice has spread. Leading construction The foreman takes pictures of the digital apparatus all stages of work. At the same time, he pays special attention to hidden processes, that is, the quality and the fact of the execution of which is impossible or difficult to check after their end. This is a bookmark and knitting of fittings in the foundation tape, the coating of the biolalector composition of the wooden parts of the house facing the ground, IT.P. His pictures of the foreman will bring a week to the office of the company. First, they appear in the report on the amount of work. Avo Second, they are placed on the site of the construction company, to the appropriate directory, address and password of access to which the customer is reported. So he will be able to control the construction, without leaving the house, on the Internet.
When to start the second stage?
The main shrinkage of walls from the bar occurs during the first year after the construction. Finally, the walls will fall after five years, and in the next four years the shrinkage will be an order of magnitude less than in the first year. Practice shows that it is not necessary to wait for a year. To determine whether it is time to move to the second stage, it is possible using a special device, measuring wood moisture at a depth of up to 50mm. As soon as the indicator reaches 12-15%, you can start the second stage.
The first thing to be done is to re-legish the gaps between the crowns. As a result of the walls of the house height, for example, 8m can "grow" about 20cm (but it is with very thorough and high-quality work). The in the distance is likely to repeated shrinkage of the walls (Inesl there is an opportunity, it is better to give it a certain time - a week or two), but it is incommensurable with primary and especially danger. Then you can proceed to finishing operations and installation of windows and doors (if they were not installed at the first stage). But carefully.
Window and doorways in the brusade house are framed by vertical racks. These racks allow you to mount joinery, without waiting for the end of the shrinkage of the building, and, in addition, provide the necessary rigidity of small simpleness. On the surface of the rack in contact with the wall, the groove is performed, in which the corresponding "spikes" slides during the shrinkage of the walls of the house (they are cut on the ends of the bars overlooking the windows or doors). From above over the windows and doors, there are technological gaps, having laid them for insulation with a soft material (for example, a flask-mounted web) - it will be deformed as wall shrinkage.
When choosing an interior finish option, it is necessary to remember that the brusade house is in motion all its life: the wood is gaining moisture from the air and gives it. It is a process involuntarily imposes restrictions on finishing methods. For example, it is better not to use drywall on its aligned and covered joints when driving the construction will certainly appear fine cracks. Help can use the so-called sliding crate. In this case, in the vertical rails, the vertical rails are made to the vertical slats, they make elongated slits, in the center of which screwed up the screws for fastening the rail to the wall (when the walls shrink the walls, the sore makes its position in the slot, but does not cause deformities of the crate). However, the probability of deformation of even such a design still exists.
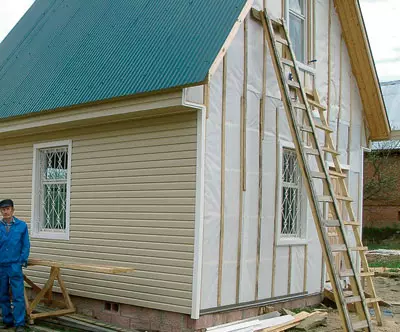
Warming at home
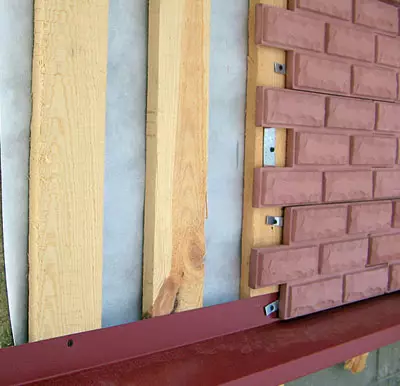
If the house decided to inspire with the help of mineral wool materials to live in it and in winter, it is better to do it outside and more efficiently, and the useful area is not lost. First, horizontal bars are stuffed, between which the mats (or stoves) are laid by the insulation, horizontal bars will not let them slide (the shade of the crate corresponds to the width of the insulation). For example, for mounting the insulation, a layer of 50mm is used 5050mm bars, for a layer of 100mm, the same bars, cohesive in two rows. Then the vapor-permeable wind insulation film (say, "Isyospan"), which is fixed with the counterclaim-vertical 725 or 5050mm bruises. First, they are able to keep the insulation from the bent, and secondly, the covering will be attached to them in the future (the step is determined by the material of the trim). Thus, there is a ventilated clearance between windproofing and insulation. Its value is determined by the thickness of the regulats.What should be the thickness of the insulation? We offer to your attention a table, in which the thermal insulation properties of the brusal walls without insulation and with a heater 50 and 100mm thick.
It can be seen from the table that with the thickness of the wall 150mm and the layer of the heaters 50mm, the heat transfer resistance of the wall does not reach a little to the requirements of SNiP 23-02-2003 "Thermal protection of buildings" for the middle band (3,2m2c / W), and at 100mm insulation exceeds them. How to get into the standard if the insulation is released only with a thickness of 50 and 100mm? You can choose the combined option: from the outside lay a layer of mineral insulation with a thickness of 50mm, and an inside-reflective insulation of 10mm thick 10mm, for example, a foil "foam" (when finished rooms it is necessary to close it with molding or plasterboard). This will not only improve the thermal insulation properties of the wall (R0Stasit 3.22m2c / W), but also organize vapor barrier (joints of the foam sheets are sampled by a special scotch), which will protect the walls from the penetration of moisture constantly present in the air of the dwelling.
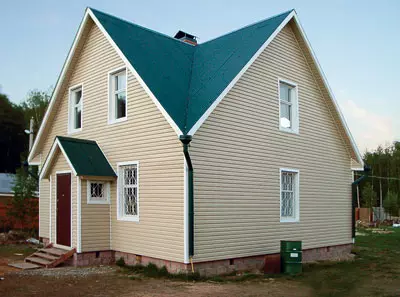
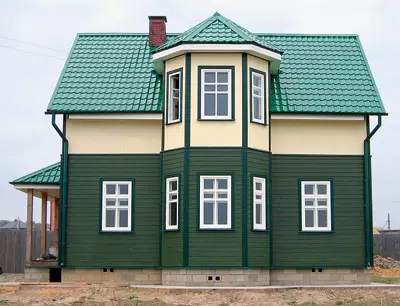
Outdoor finish
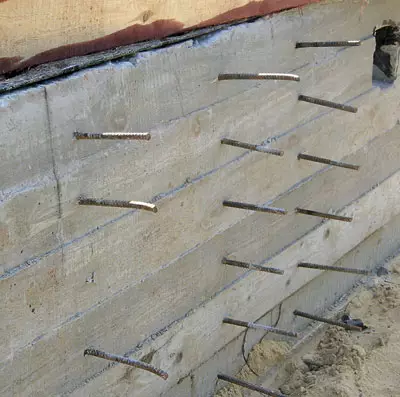
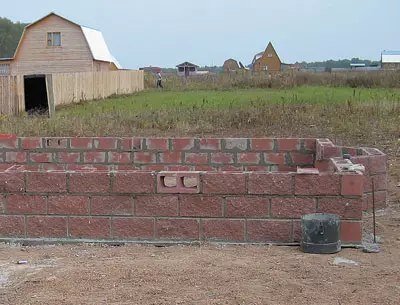
The easiest option is to sharpen the walls, and then cover the biolated composition. You can make them brick if the foundation for it is originally designed. Moreover, the brick lining should defend from the wall or from the layer of the insulation on 5-7cm, so that the ventilated clearance is formed. In addition, the brick is connected to the metal bonds with a lap 30-40cm in height and 1-1,5m in length. If the walls are insulated, they must be understood, not only in protective, but also in aesthetic purposes. Punching of the outer sheat can be used by lining, block mobile, siding and other materials. The choice depends only on the taste and financial capabilities of the home owners.
The enlarged calculation of the cost of building a house with a total area of 148m2, similar to the submitted
| Name of works | Number of | Price, $ | Cost, $ |
|---|---|---|---|
| Foundation work | |||
| Takes up axes, layout, development and recess | 38 m3. | eight | 304. |
| Device base for sand foundations | 37m3 | 2. | 74. |
| Device of the foundations of ribbon reinforced concrete | 23m3 | 60. | 1380. |
| The device of retaining walls from concrete blocks | 14m3 | thirty | 420. |
| Installation of the strapping bar | 63 pound M. | 3. | 189. |
| Waterproofing horizontal and lateral | 60m2. | four | 240. |
| TOTAL | 2607. | ||
| Applied materials on the section | |||
| Concrete heavy | 23m3 | 62. | 1426. |
| Sand career | 12m3 | fourteen | 168. |
| Block concrete | 14m3 | 80. | 1120. |
| Masonry heavy solution | 3.9m3 | 55. | 214.5 |
| Bar. | 1,8m3 | 120. | 216. |
| Hydrophobic composition | 20l | 2.5 | fifty |
| Hydrosteclozol, Bituminous Mastic | 60m2. | 3. | 180. |
| Armature, Formwork Shields and Other Materials | - | - | 330. |
| TOTAL | 3705. | ||
| Walls, partitions, overlap, roofing | |||
| Cutting walls and partitions from BRUSEV | 32m3. | 90. | 2880. |
| Assembling overlaps with laying beams, with floors | 148m2. | 12 | 1776. |
| Cabinet stairs, veranda, porch, visors | set | - | 460. |
| Assembling roof elements with crate device | 230m2. | - | 1800. |
| Isolation of overlaps and coatings insulation | 378m2. | 2. | 756. |
| Device of vaporizolation | 378m2. | one | 378. |
| Metal coating device | 230m2. | 7. | 1610. |
| Eaves Bearing, Svezov | 45m2. | fourteen | 630. |
| Filling opening windows and door blocks | 39m2 | 1360. | |
| Antiseptation ready-made solutions | 220m2. | 3. | 660. |
| TOTAL | 12310. | ||
| Applied materials on the section | |||
| Sawn timber | 49m3 | 110. | 5390. |
| Poland boards | 6m3 | 140. | 840. |
| Steam, wind and waterproof films | 378m2. | 1,3. | 491. |
| Mineral wool insulation | 378m2. | 3. | 1134. |
| Metallic profiled sheet | 230m2. | 6. | 1380. |
| Wooden window and door blocks | 39m2 | - | 2300. |
| Neck-protecting compositions | 70l | 0.8. | 56. |
| TOTAL | 11591. | ||
| * - the calculation is made on the averaged rates of construction firms Moskva without taking into account the coefficients |
The editorial board thanks the ABS-Stroy firm for the provided photos and assistance in the preparation of the material.