
Practical experience of solving problems arising when installing plastic windows. Phased instructions for measuring window opening before decoration of slopes.
There are many problems when installing new plastic windows. What kind of problems, how they should be decided, we tried to check on our own experience.
A man is a gambling creature.
There is a good enough of him, he gives the best.
Charles Lam.
The windows are now selling so much that it is difficult to get confused at the stage of choice: plastic, wooden, aluminum and combined-wood aluminum, "metal-contained". However, at the stage of realization of the conceived and at all begins such that, as they say, "neither in a fairy tale, nor ...", especially in the magazine article. And what you just do not listen, traveling by firms or talking to their managers by phone! Especially love to scold competitors. After listening to everything, the choice, however, do it yourself. Comparison, as far as possible, technical feasibility, financial costs and personal preferences.
But the choice and booking of windows is not even fellow. After all, the wrong installation let the most "steep" windows can become a headache for you for the entire period of their operation. The problems arising from installation are devoted to this article, written not only on the basis of consultations that helped us and analyze the relevant regulatory documentation, but also under the impression of their own practical experience. To acquire this experience, the author ordered a set of plastic windows for its apartment. They were chosen not only by financial considerations, but also as the most "typical", currently enjoying predominant demand.
Works on the replacement of windows can be divided into four stages. The deadline for the first of which is not limited to anything because it depends only on you. Three subsequent, associated directly with installation, last three working days. We draw attention: not calendar, namely workers. The calendar term of the execution of these three stages is 7-8 days. We will break our story on the part in accordance with the stages and as they need to discuss the problems arising.
Stage first preparatory
At this stage, your task is to decide which windows you want to have (single-chamber, double-chamber windows, with energy-saving glass or without, etc.), which functions they must perform in relation to your specific conditions (noise insulation, thermal insulation, etc. .) And from the profile of which firm will be made frames. To do this, measure the window openings and, having the results of measurements on hand, discuss the problem with different firms. As a result of all these events, you must have at least an approximate picture, which will cost exactly your windows, and what exactly will you get as a result of this installation (the very thermal insulation or sound insulation). What windows prefer and from which profile cannot be advised. Avot recommendations on the choice of the installer still give. As experience shows, the windows are better to order in companies with their own production or are official dealers of a well-known European manufacturer of profiles. And the more famous profile manufacturer, the higher the quality quality guarantee.Stage Second: Ordering
When you decide on the choice of a direct artist, call the Master-Measperwriter. As a rule, he comes to a predetermined day with you to the appointed hour. It is tasked with the measurements from the openings for which the windows will be manufactured. The conservalers should also discuss all the requirements for future products: select the number of cameras in the profile and the window configuration (number of sash and methods of their opening), the number of cameras in the double-glazing, their width, the thickness of the glass used and the ability (necessity) of the use of glass-saving glasses. Symenie you are discussing the installation of new window sills and sings, their width and configuration, as well as the material from which they will be made. Immediately list additional accessories: mosquito nets, stopping limiters of sash, etc.
The result of communication with the master of the measurer should be the compilation of an order in which all your requirements will be painted in detail and which you need to carefully check and sign. Under this document, the master calculates the exact amount in which the windows and decoration of the slopes will cost. By the way, in some firms the measurer makes not an order, but at once a contract, after which you can only make an advance, which makes up 60-70% of the total amount (without this, no firm for the manufacture of windows will be proceeded). The rest you pay after the end of work. To make an advance will need to visit the office of the company the next day.
Opening - Light in the wall for the window.
Fourth - "Sample" in the window opening, protecting the frame from the outdoor side.
Frame (In the technique) - the rod system, the elements of which (racks, riglels, sores) in all or in some nodes are rigidly connected to each other.
Sash - opening part of the window. It can open (outward or inside) or lean, depending on the type of accessories used. Rotary-folding flap is capable and open, and lean.
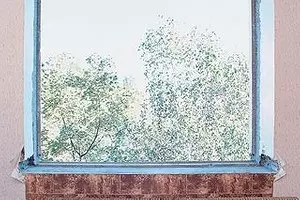
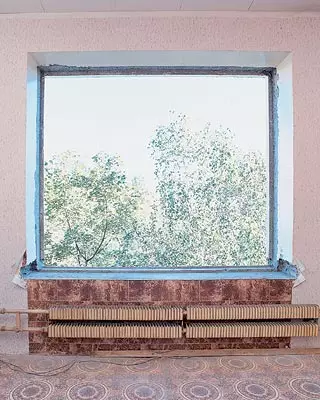
Slope - side of the window opening. Slopes are divided into external (from the outside of the window) and internal. Internal is made, as a rule, expanding towards the room to enhance the light flux.
Low tide - option for the finishes of the outer window slope, allowing to remove rainwater falling outside the opening.
Window board (Window Sill) - Plate lying on top of the lower jamb (sloping) windows, with a protrusion outside and inside.
Ateper about problems arising at this stage.
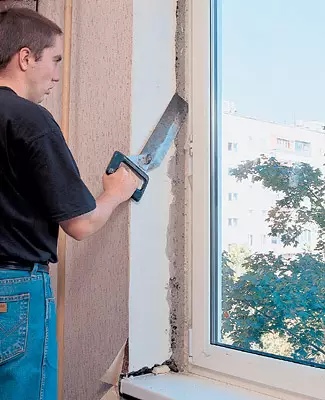
What are the walls made of? The first problem is manifested at the installation stage, although it occurs much earlier. It is, let's say, in the "not quite correct" defining the size of the future window (which happens only when replacing old structures). And the measurer coming to your house, in its occurrence, it may be absolutely unhappy - in the opening there is an old window that does not allow to know what is a wall and how fastened in the opening of the frame. As a result, after dismantling the old frame, rebuilding plaster and removal of "pouring" and "disappeared" fragments, it suddenly turns out that the opening exceeds the size of the new frame (sometimes much).
From this misfortune can guarantee a high qualification of the wizard that performs measurements, and the decency of the firm in which you turned. The markman must have not only an excellent spatial imagination and an analytical mindset, but also a good knowledge of the designs of window openings in houses of various types and series. The height is comprehended mainly on the basis of a long practical experience.
A qualified measure of the future window is made necessarily on both sides of the opening (from the room and from the street), which is necessary for the correct determination of the depth of the so-called quarter. This requires reliably to determine the material and strength of the outside of this quantity itself. And only if they do not cause doubts, you can proceed to calculate the size of the frame. Ideally, if the frame will be larger than the outdoor size of the window opening by 25-30 mm on each side (that is, on each side it will enter the fourth groove on this value). In practice (unfortunately), it is not always possible to satisfy this requirement (in the homes of different series of quarters, it is strongly vulnerable). But we must try to make the frame to enter the grooves of the quarter evenly from all sides, otherwise the window will look like that of his frames collected from a broken profile. In addition, when measured, it should be determined how much the existing opening (which is not at all uncommon in our construction). Strong skews will have to compensate for an increase in the size of the window (by the size of the skew), and the way in line.
Now about the decency of the company. When finding out that the exempted opening, by virtue of the circumstances described above, a much larger than the manufactured frame, employees, so let's say, the "dishonest" company instantly begin "hitting" to the customer: "But you have here! .. Ama what? " The "decent" company takes almost all the blame on himself, and the installers, notifying the Customer about what happened, proceed to finding ways to solve the problem. They can be somewhat here, from a decrease in the size of the opening by any of the ways that are acceptable in this case before sending the finished window to the alteration. The choice of one or another solution depends on the degree of divergence of the size of the opening and frame. If these discrepancies are small, the opening is simply plastering. If high, the window is sent to the alteration, which is carried out during the working day. After that, the frame of "enlarged size" is delivered to the place (there is no man to live indoors with an empty window opening!). The racobo "outstanding" cases is possible to achieve a compromise solution, or a brigade of builders (if there is a customer's customer) lays out with a brick, and the installers customize its size under the available frame, or the size of the frame increases due to special additional profiles (they will have to urgently ride), which It is "risked".
What material to choose for window sills and sweats?
High and stable popularity in the manufacture of window sills are used by two materials - laminated chipboard and PVC.DSE-based window sills - durable, hard, wear-resistant (laminate covered). You can safely get up during the washing of windows, put a hot kettle and move the flower pots on their surface. Although they are produced on the basis of a waterproof chipboard, "waterproof" such a windowsill still make it possible to close the sealant (for example, silicone) open sections or gluing plastic "plugs" (price 1 pc. - about $ 1).
Plastic window sills Moved, like window profiles, from PVC by extrusion. The surface, as well as the windowsides from the chipboard, is protected by wear-resistant laminate. Such products are not affected by moisture and microorganisms (which is important if you breed the flowers), and their surface is resistant to mechanical damage. Have a solid cellular design, not subject to shrinkage, differ in the low thermal expansion coefficient. Weigh are significantly less than the windowsill from the chipboard. When finishing the ends, special plugs are used, fastened with glue (about $ 1 / pcs.). Kednostats can be attributed to the likelihood of dents (you can even break the surface with strong blows.
In addition to the two named materials, the "classic" array of wood, artificial and natural marble, etc., are used in the production of windowsill, artificial and natural marble, etc. But this is already, as they say, exclusive.
Films are mainly metallic. The cheapest is galvanized steel, which are stained after installation. Aluminum is counted more "survivi" than from "galvanized", but will cost at least twice as expensive. If you order windows for your own house, we advise you to think about steel places with a plastisol polymer coating under the color of the metal tile roof. True, they are even more expensive aluminum.
Often, the client occurs a desire to immediately use dismantled frames (if they are quite decent), for example, for the country house, glazing balcony, the construction of a greenhouse, etc. To implement this desire, it is necessary at least to prevent the brigade about him in advance. It is also not bad to "encourage" the performers of this work, since the preservation of frames in direct responsibilities is not included. But keep in mind that it is not always possible to implement such a desire. For example, in panel five- and nine-storey buildings of the construction of the 70-80s, the frame "was inserted" into the panel during the manufacturing process, and it is possible to remove it from the monolithic concrete. So, only the sash of old windows will be seized, the secondary use of which in the absence of RAM is problematic. Another problem will appear: where to go large-sized construction trash - "remains" frames and sash. (In the Typical Agreement there is a paragraph: "Disabled windows are the property of the customer and remain on its territory"). The horses of these "remains" are also not obliged to export, it means that it will have to conclude with a firm conducted by the installation, an additional contract for their export.
Stage Three: installation of windows
This stage you are experiencing the least five days later, more than two weeks after ordering the windows. He begins with delivery, which does not cause special concerns from the Customer, - the executor firm is fully responsible for it. The only thing you can encounter is the need to pay for the lifting of the delivered windows on the floor, and it is only if there is no cargo elevator in the house, and they are not fit in the passenger. Keep in mind: This case, as a rule, is provided for in the text of the contract, and there is also a fee for the rise of each window on one floor (read carefully!).
By the arrival of the Brigade of installers, the "work platforms" should be prepared near the windows: remove the curtains and eaves, move the furniture, remove carpets, close the floor by any grain material (cardboard, organitis, plywood, etc.). Radio equipment (especially expensive) should be either transferred to the room where the work will not be done, or to carefully hide from dust, which is inevitably formed during the dismantling of the frames and will fly from the street in the temporarily open opening.
In the following stage, the following operations are performed:
Flats are removed from the old frames, disassembling frames;
Repair and mounting window openings are manufactured (see above);
New windows are exempt from attachments and double-glazed windows (in the "deaf" sash);
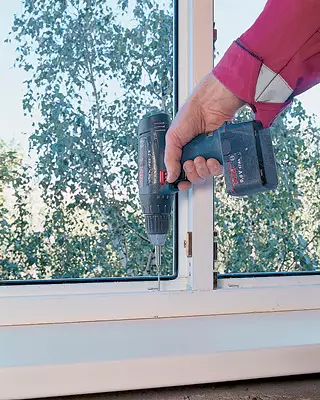
In the frames in advance the holes in the places of future mounting to the walls of the opening are drilled;
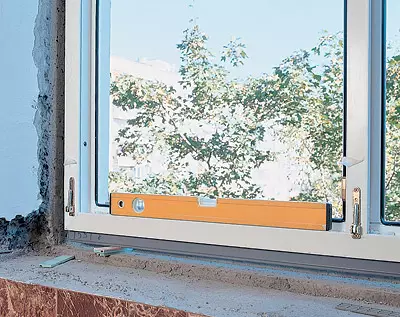
The frames are inserted into the opening and aligned vertically and horizontally;
In the walls of the opening, holes are drilled in accordance with the already existing in the frame;
The frames are fixed in the opening with the help of fasteners;
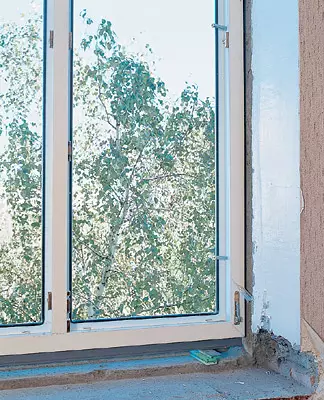
Salves are searched in size and installed in place;
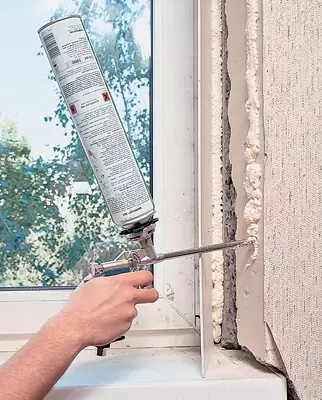
The space between the frames and walls of the opening is filled with foam;
The window sills are adjusted in size and installed;
Flats and double-glazed windows are returned to the frame;
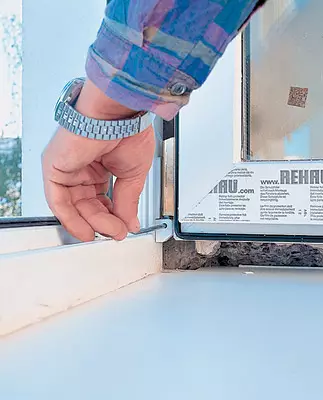
Handles are installed on mounted flaps, after which the accessories of these sash are adjusted;
The loops are closed with decorative caps.
At this stage, you can encounter the problem of pairing a window block with a fencing design. And it is meant not just seeling the gap between them. It is in a literal and figurative sense, a narrow place must perform a number of functions:
Prevent deformation arising due to temperature drops at different times of the year, reliably compensate for the longitudinal deformations of the window and transmit all the load perceived by it (with sufficient safety) to the structural elements of the building;
With the help of sealed sealing of the joints, completely prevent the penetration of rain and melt water during durable airproof seam;
Provide reliable heat insulation - exclude the formation of the so-called "cold bridges" in the window of the window adjoining the windows to the surrounding structures.
Where should the windows frame be located in the depths depth? If the wall thickness is conditionally divided into 3 equal parts, the frame of the installed window must be at 1/3 of the wall thickness from its outer surface (that is, the first third of the street is measured). It is so recommends that the Most of the manufacturers of window profiles are recommended. Why is it important?
The fact is that, as a rule, model from PVC (as in our case) have a narrower than old wooden windows, a box (about 60mm). Operating experience convincingly proved that a narrow window box causes elevated heat loss through the slopes (in the cold season), with which the condensate loss is associated both on the surface of the slopes themselves and on the surfaces of the frame, sash and double-glazed windows. Why is this happening? When installing windows with a narrow box in a single-layer outer wall, thermal drains dramatically increases through the slopes (bypassing the box). A precision that the window block turns out to be placed in the zone of negative temperatures, heat flows are not only through the slopes along the box, but also in the thickness of the wall.
For the sake of fairness, it should be noted that the freezing of slopes and loss on their condensate surfaces is the problem of windows not only from PVC. This is a general lack of window blocks with narrow boxes installed in single-layer wall structures (solid concrete, brick, etc.). Of course, the models with a wide box are more suitable for our climate, and there are such products on the market (for example, Finnish production), but they will cost more than their "narrow" fellow.
It is possible to solve the problem of the appearance of condensate when observing such conditions as the competent installation and insulation of the space between the window box and the outer wall with the simultaneous insulation of slopes. The recommended taking control of the "condensation problem" is the displacement of the frame to the center of the wall. It is especially appropriate in brick structures of large thickness, because, among other things, it helps to increase the temperature of the inner glazing surface due to the convective heat exchange.
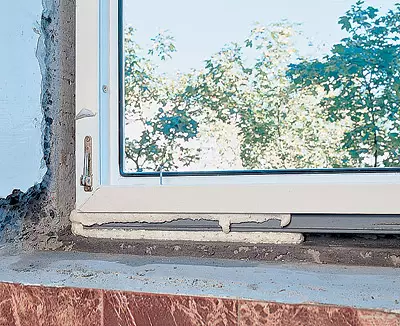
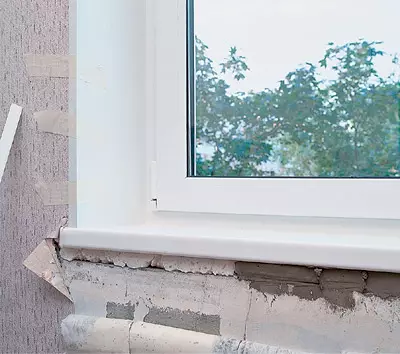
Often the Customer refuses to install new windowsills and swells, motivating it as their high-cost and quite a decent state of the former. Here we want to warn: if the savings on the lowers do not create any problems (they will try, and "apply" an old window to a new window), then with the window sills they may well arise. Firstly, the box of plastic windows is an old wooden, so a very significant slot will appear between the windowsill and the frame, which will have to be neglected. Secondly, in the panel houses the old windowsill will be somewhat lower than the alleged new one. As a result, another gap may appear, already vertical, which will also need to be embedded. And now imagine how all this "dressing" will look like on the background of your new-minded windows, and think about whether to save.
Alignment frame. On the correct installation of the frame in the opening, you need to pay close attention. The window frame must be mounted strictly vertically and horizontally, which is checked using the appropriate tools (the construction level is mainly used, sometimes a plumb), but in no case in parallel the lines of the opening, which, as a rule, is slightly "oblique." A set of adjustment plates is used to align the frame (they have a different thickness, which allows you to accurately dial the necessary overall size) or wooden wedges. After the mechanical fastening of the frame in the opening, these "supports" are removed. With large window sizes (length 2m or more), when not enough metal fasteners for perception of the load, the support pads are additionally installed (mostly wooden). They are located at the corners of the box, as well as in the zones of racks and riggers and remain there, which is called, forever.
Gaps between the frame and walls of the opening. When installing the frame, it is also important to trace so that there is a strictly defined gap (15-30 mm) between it and the walls of the opening, which will then be "married". Naturally, we called the ideal width of the gap, which in practice it is rarely possible to achieve (more often the opening turns out to be shedding, and so on.). But in any case, it is necessary to ensure that the gap will be uniform.
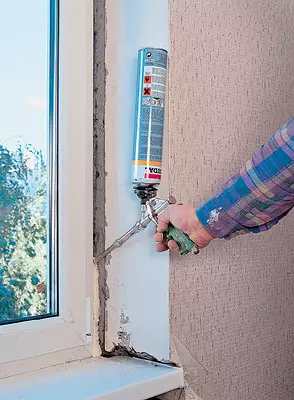
I foresee at once two "why": why is uniform and why it is "married"? With all the diversity of building materials, currently almost the only method of sealing the junctions between the window box and the wall is to fill the space by polyurethane foam. The coincible advantages of this option should include ease of use and relative cheapness, indifference to the irregularities of treated surfaces and, as a result, reliable sealing, excellent thermal insulation properties of foam and its ability to take on itself and evenly distribute mechanical stresses and wind loads evenly. In other words, there is no more technological way to date. That foam is a heat insulator, just explains the requirement for creating a uniform gap around the perimeter of the window. But the gap wider than 30mm also does not need, in all technological instructions, foam can be poured with seam within this magnitude. That in practice it is not always possible to implement again because of the curvature and irregularity of the opening. But striving "to ideal" the principle "The more foam, the better" in this case does not fit at all.
An even more effective solution is the device of thermal lady, located in the wall, along the inner surface of the slope. The procedure looks like this. Along the window slopes, the rectangular shape is made, in which the thermal lady of polystyrene foam, the mineral wool plate, etc. is laid. The thickness of the thermal lady should not be less than 30-40 mm, the width is determined by the structural solution of the wall and its heat-shielding properties. Such a technical solution is guaranteed to increase the temperature of the inner surface of the wall and the improvement of its heat shield qualities in general. But ... honeymage, this method of insulation of slopes will not always be carried out (for example, to drop monolithic concrete around the entire perimeter of the window is unlikely to be). Avota with new construction its use is quite justified.
How to fix the frame? There are two generally accepted methods for fastening the window frame to the enclosing structure: direct, through the box, anchor bolts (as a rule, with a diameter of 10mm in a step of no more than 800 mm, from the angle-150mm) and with the help of a metal plate, anchor attached to a special plastic lock on the external side of the box. The specification has its advantages and disadvantages. The first of these allows you to fix the window in almost any opening and guarantees the transfer of loads directly to the internal metal reinforcement of the frame. The method is universal, guaranteed reliable and simple. The method of fastening using plates-anchors is less common for large windows (when the weight of the frame lies on the above-described support pads). This method is no less simple and no less reliable. Away the case of the thermal lady's device is generally indispensable (the mounting bolts is not realized here).
"I want a wide windowsill!". The problem of condensate falling on the surface of the glass is often exacerbated by the fact that at the request of the customer too wide window sills are installed. Passing into the room, they cover the path of the convective flow of warm air, rising from the heating device (radiator) along the glasses. It is evident before ordering solid wide windowsill, it is necessary to think about. If such a similar window sill is so important, equip it with a special grid (perforation) in the middle, it will help restore air convection.
How to fix the windowsill? Two ways of fastening are known:
On a construction solution. The lower surface has longitudinal grooves like "Swallow Tail", which guarantees clutch strength.
Using a mounting foam. In this case, it is necessary to draw attention to the fact that a large effort created by expanding foam can begun, and even to "unscrew" the windowsill from the opening. To prevent this trouble there are two ways. First, install vertical struts in the opening (for example, wooden, the tops with one end about the windowsill, and the second of the top slope). The second is to conduct "marching" in two receptions. For the first day, foam under the windowson is applied only in three or four points, after which it is left alone for a day. As a result, after complete frosting of the foam, the windowsill turns out to be very firmly glued to the slope, but not entirely, but "islands". They will not let him argue or move from a place at the final "fudding" the next day.
| Width, mm. | Laminated PVC | Laminated DPP | |
|---|---|---|---|
| Venta (Belgium) | "Plastform" (Russia) | Westag Getalit AG (Germany) | |
| 200. | twenty | fourteen | 35. |
| 250. | 25. | sixteen | - |
| 300. | thirty | eighteen | 38. |
| 400. | 35. | 22. | 40. |
| 500. | 38. | 29. | 45. |
| 600. | 40. | 34. | fifty |
Stage Fourth: Trim Opera
Since most of the firms with installation and finish are engaged in different specialists, at this stage you meet, as a rule, with a new brigade - finishers. They perform three main operations:
Record external slopes;
discharge internal slopes;
Produce the final seal of the windowsill.
Upon completion of these operations, the work is handed over to the customer. It checks the operation of windows (whether they are easily open / closed) and sign an act of acceptance of installation work.
In the process of performing this stage, it is necessary to answer for yourself to the following questions:
Is it necessary to separate the slopes? Finishing of window slopes - the operation is not cheaper. Efforthily from the method used, the cost of the route may reach $ 25-30 (and with the middle widths, the wide width cost even more expensive). It is the high price in most cases and is the reason for the customer's failure from this operation. Not to mention another one not quite the "righteous" thought: "The window is supplied and" stamped ". Here is this foam, let it still be. Agotum will come up with something." And these "while" and "then" can stretch very long. Is it possible to leave the window for a long time in the form in which the installers have passed you?
The answer is unequivocal: it is impossible! First, the foam is destroyed (darkest and becomes fragile) under the action of sunlight. In addition, in the hardened state, it increases the volume by 5-10% and as if "crushes" itself. As a result, a gap is formed between the frame and foam over time, which reduces all sealing efforts. Secondly, foam is not a waterproofing material, it will constantly recruit moisture, which, freezing, foam itself and destroy. But even before destruction, the material will cease to be thermally insulated - an increase in the humidity of only 5% reduces its thermal insulation properties by 50%. Consequently, the foam must be immediately protected from atmospheric influences (speaking easier, the outer slope must be neglected immediately!). And one more argument in favor of this. If there are "deaf" parts in the windows, then after returning glass windows, the exterior seams may be partially inaccessible. Again, you will hardly want to shoot the glass windasters.
With finishing of internal slopes, you can wait a little bit. This is especially true if long-term repairs with redevelopment are assumed in the apartment (house). You want to start it, you do not want to have to install new windows. Mounted windows - cover them with polyethylene film and continue repairs. Apresses are separated at its final stage.
| Width, mm. | Galvanized steel (0.55mm) | Aluminum | Steel with plastisol polymer coating |
| Up to 150. | 3. | 7-8 | fourteen |
| 150-250 | four | 9-12. | fourteen |
| 250-350 | five | 14-16 | 14-18. |
| 350-400 | 6. | 18-20. | eighteen |
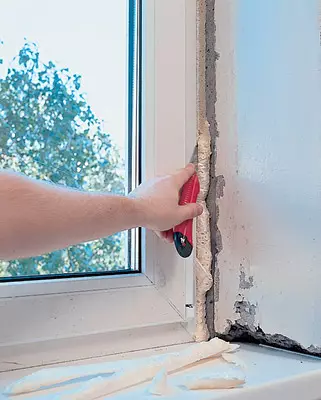
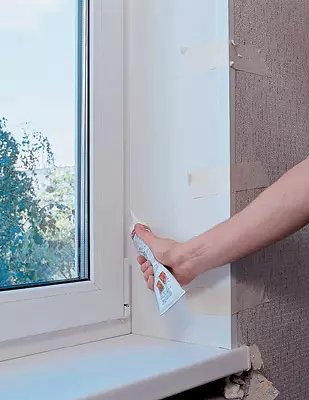
How to separate an outdoor slope? With a small width of the seam (maximum 15mm), it is recommended to use either silicone sealant, or a technological, but very expensive polyurethane self-insulating sealing tape (paired with a vapor barrier tape, installed on the inside, which costs $ 3/5. None of these methods is perfect. Water-soluble facade paint (namely, in most cases, the hosts are used for outdoor slopes) on silicone sealant falls, let's say so, not very good. In addition, under the influence of atmospheric phenomena, the sealant darkens over time and begins to stand out even under the layer of paint. But the worst thing is: gradually this material is aging, peeling and stops protecting the foam.
In most cases, the sealing tape of the psyrals is simply impossible, adjacent to the window the wall surface is so uneven, and the opening is so spoiled that the seam width around the window perimeter ranges from 0 to 5 cm (!). Cast conditions are the only output, and then paint. How and what? Finishes of the firm "Okvavest", which carried out work on the installation of windows in our case, for several years have been used by technological and at the same time inexpensive method-plastering ... Water and frost-resistant glue for tiles. This material sticks to almost any surface (and what is called, to death) and not afraid of water (used for facing tiles of bathrooms and even pools). Agree, a rather unusual way of sealing, but it was decided to use it. How to tell you, tell me a year later. Naturally, glue is more expensive than ordinary plaster, but small consumption, convenience, the quality and strength of the surface obtained completely compensate for damages.
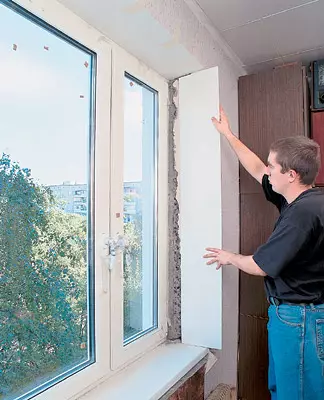
How to separate the internal slope? Options for processing internal slopes Two: plastering and finishing with plastic. And do not forget that this slope, as we said, it is necessary to inspire.
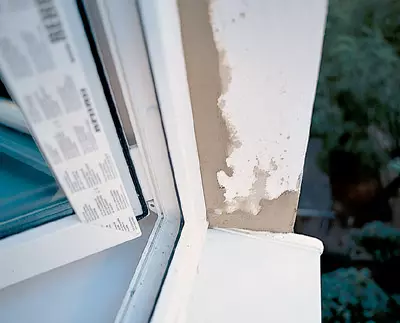
Plaster. The simplest and cheapest option that comes to mind is to purchase ordinary plaster and ... but it was not there! The absence of well-insulating properties in the plastered disappearance of materials with good thermal insulation properties, only increase the probability of overcooling of the opening in winter, which will lead to the supercooling of the window itself and its elements and cause condensate loss. So "why fought"? Why change the window?
Of course, there are various materials in the modern market, for example, heat-insulating plaster, which can then be sharpened and painted. But (again, but!) The presence in the plastered slope of the layers having different coefficients of volume expansion (compression) can lead to cracking of the surface due to the non-uniformity of internal stresses.
There are also several unpleasant moments related to the finishing option. With deep potholes, in the slope, it will take use the reinforcing grid to be used to sequentially apply 2-3 layers of the solution. Moreover, each subsequent can be applied only after drying the previous one. Before putting down and painting, it is desirable that the window slopes are saturated for a long time. In general, the "wet" version of the finish will take a lot of time. But the most unpleasant in this method is that a crack (or even a grid of cracks) will inevitably appear in the zone of the slope, due to the difference in linear plastic and plastering coefficients. And then, neither try to sharpen and paint this zone, after a while the defect will inevitably appear.
Finishing plastic. This option will require only two to three hours to your embodiment and about a day on the final drying. Plastic slopes in most cases are attached so: the surface under them is "fought" (foam and will be insulation), and the panel is glued with this foam.
Options for decoration of slopes plastic set. Forward queue, it is worth mentioning the so-called Standard Silent Systems manufactured by profile manufacturers. As a rule, these systems have two drawbacks. Firstly, the slope is located at a right angle to the frame, which is not very familiar, and for installation it is inconvenient - we have all the slopes expand inside the room, and the resulting gap has to fill something. Secondly, the standard system is not at all cheaply due to the lack of demand, some manufacturers simply stopped them.
You can use I. Cellular wall panels widely used for interior decoration. Such panels are offered, for example, Deceu-Ninsk (Belgium) - 270025010mm- 7.5; RBC (Russia) - 270025010mm- 4.3. But this method has the following flaws:
The color of the panels is almost always different from the window color (yellowish imported and grayish in domestic products);
The panel itself (with a thickness of about 10 mm) has quite thin walls, so the ribs that are inside it inside it will be shifted, creating the effect of "bands."
Venta (Belgium) produces for dissection finishes Special cellular panels , very similar to the mentioned walls, but with a thickened face (the ribs are not shining) and the casing. But the decoration of slopes by these panels was also not widely distributed due to their high cost (600025010mm- 37).
The most widely currently uses two options for breakdowns: sandwich panels and panels from PVC foamed.
Sandwich panels There are 2 sheets of plastic, between which there is a layer of foamed (in domestic) or extruded (in imported) polystyrene. Produced with a thickness of 8 to 36mm. Domestic products (Om-Plast) size 15003000 (8-9) mm will cost approximately C = 62, imported (Kmerling, Vekaplan-Germany) of the same size - approximately in C 68-70. The advantage of this method of finishing is obvious: Suns in principle do not necessarily be insulated, since the insulation is laid in the design of the panel. The disadvantage is that under the action of moisture, the panel can escape.
PVC foamed (Plates with a uniform porous structure) is produced with a thickness of 1 to 10 mm. To finish the slopes, you can use slabs with a thickness of 3-4mm (1 thoughs, along with the work will cost $ 16-18, depending on the width of the slopes) and 8-10mm (1 of the sliver together with the work will cost $ 20 -26). The collaboration of foamed PVC should include homogeneity (smell there is simply nothing) and the complete collar of the color (white) with the color of the window. The panels are made in a large range of sizes (width from 1000 to 2050 mm, length from 2440 to 4050 mm), which allows installer firms with the correct selection of the size of the source slab minimize waste, thereby reducing the cost of finishing. The disadvantaged material is relatively soft, therefore, a dent remains from the impact of the solid object (as, however, on the plastic window sill). Produces such plates, such as Kommerling (Germany) under the Komatex trademark. The price is from $ 9 to $ 158 per panel, depending on its size and thickness.
This option has another advantage: panels are available in a wide range of colors. True, colored products will cost 1.5-2 times more than whites. There is also the possibility of ordering plates in the option "under the tree" of different shades, but they will have to wait from two weeks of the Domane. But you can cite the design of window slopes in full compliance with the design of the entire room. Panels are available not only by matte, but also glossy (Komasel model from Kommerling). In our opinion, the matte products are preferable (the manufacturers themselves agree with this) - they do not look so pompous and not glared in the sun.
We will negate that the option of decoration of slopes with water-resistant plasterboard is not considered by us, since the company-installer firms are not taken for it. But you can use this method of finishing. Only independently and, provided that the plasterboard will be lined with the walls adjacent to the slopes.
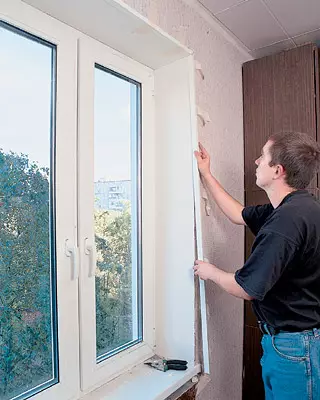
When finished using a PVC panel panels, the external angle of the slope (zone of the panel of the panel) is closed by corners. They are two types:
Reusable- can be installed and removed repeatedly (which is very convenient when repaired). We are issued by Venta and Deceu-Ninck. The price is 2.7-3.0 at a length of 2.7 m.
Glued. Dimensions - 15152, 20202, 30304, 40202, 40204mm with a length of 2.7-3m. Such corners produce, for example, the same Kommerling company (the price is 1-3.5 per month), as well as Bolta, Germany (the price is 1.1-1.9 per month). The glued option is perhaps the cheapest and affordable (it was used in our case). By the way, the white color of such corners is very precisely the same as a shade with a plastic window.
If we talk about the combination of design of windows and slopes with the design of the room, it makes sense to mention the possibility of using self-adhesive films. Not those sold on each building market, but special used for the manufacture of advertising street shields. Why exactly them? "Live" these films in street conditions up to 8 years, in the conditions of the same apartments will be almost eternal. Shades - Thousands. These products are produced by German X-Film firms (Starex, Normex, Mtgarex) and Orafol-Klebetechnik (Oracal). The price is 1M2, from 1.3 to 8.6.
What to close the slit In the zone of the window side of the windowsill to the frame, withdrawn panels and panels to each other? The overwhelming majority of firms (90%) use silicone for this purpose. The option is quite acceptable and even beautiful. The disadvantage is that under the influence of ultraviolet and humidity silicone begins to darken. The enclosure of the seal in a year and a half looks like a dirty stripe, and with a wet cleaning, silicone balls are rolled. In fairness, we note that this is not all silicone sealants behave, there are quite decent, which are not darker, and do not roll. But only specialists can understand the quality of the materials, and therefore you will have to rely on the experience and honest word of working for your finishers.
In the view of the specialists who carried out the finish in our case, it is better to apply PVC glue for sealing gaps (it is also called "liquid plastic"). This product is produced by the profile manufacturers (for example, this glue has REHAU) as a "Repair Kit" for seelings of cracks in frames and PVC sash, if any arose. It slightly dissolves and then gluits two conjugated surfaces with each other. The seam as such is not visible, and the laying place looks like a "monolith". Color exactly corresponds to the color window. The disadvantage of the window sill, which constantly experiencing dynamic loads and has a special dirt-repellent coating, the glue with the high probability still "bounce". As a result, a gap is formed between the windowsill and the frame, but very thin-hair-shaped. It must be warned that this glue does not receive this glue, but there should be at the disposal of installer.
What to launch space under the windowsill After the final "marking", frozen and trimming foam? We think you yourself already guessed the same glue for tiles that the outer slope was placed. If it is necessary to separate the wall under painting, the surface is attached to the glue, and it will be necessary to sharpen, and if it is supposed to be placed with acrylic soil.
Warranty and care. A decent firm guarantees free service maintenance for at least three years (the largest - 5 years). Warranty on the installation of slopes should be at least 3 years. Now about leaving. Everything is simple here: at least once a year, it is worth calling the wizards for maintenance of windows (just like a car). The cost of such a call is approximately $ 20. I don't want to find out where the rubbing parts are located, where at least once a year you need to apply lubricant, and maintenance yourself. Yes, do not forget to process the rubber seals with the lubricant specified in the care instructions (which are required to provide installers). And then your windows will live for a long time and without problems.
Does it be necessary to do a common repair in the room after installing the windows in it? At your own experience, it is checked: a general repair is not necessary. Avot Local, Cosmetic, will have to. The easiest way to get a wobbly border, suitable in the drawing and color to the existing wallpaper, and go to them the perimeter of the window. By the way, the "edged" thus will only win the window. Well, the outer slope will have to be covered with acrylic facade paint.
The editors thanks the firm "Okvavest", "Chameleon", "Warentek" for help in the preparation of material.