
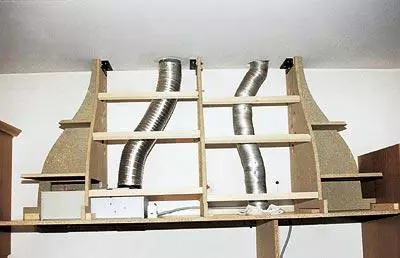
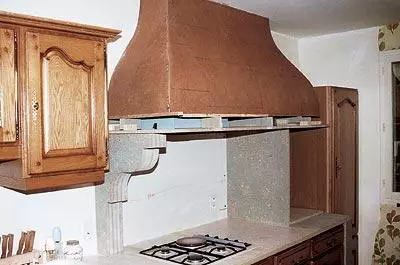
Casing, hiding filters and exhaust pipes. The dimensions of the elements, the assembly scheme, final finish.

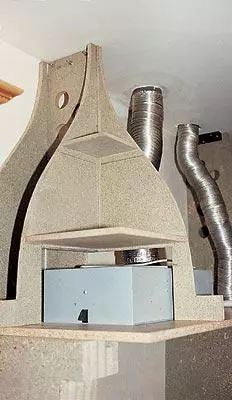
The elements are installed. The picture shows the holes for air exchange, as well as an industrial air filtration unit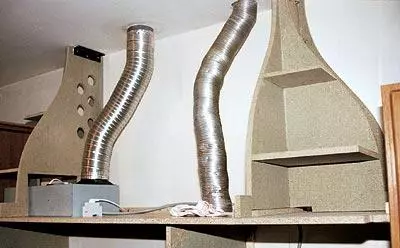
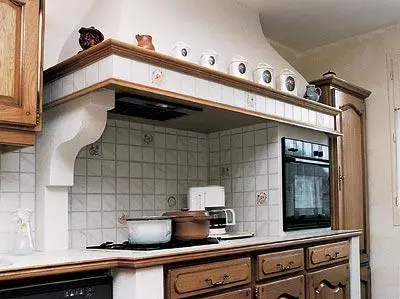
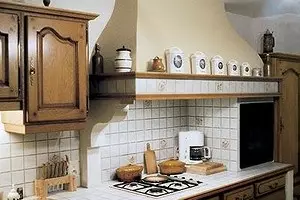
Installation of exhaust over the stove in the kitchen most often meets the aesthetic requirements of the owner. Hood (project Mark Dubrel) will be able to take root in many kitchens.
You need
- Panel from glued plywood, chipboard or oak board, thickening 19mm, 6301850mm.
- Fiber fiber 3 mm.
- Wood-chip stoves 19 and 30mm thick.
- Spruce strips 2727mm.
- Oak baguette.
- Screws with flat wood hat.
- Screws for chipboard.
- Carpentry glue.
- Primer.
- Putty.
- White waterproof paint.
- Industrial extract with built-in lamps and filters.
- Ventilation metal pipes with rings for fixation.
Structure
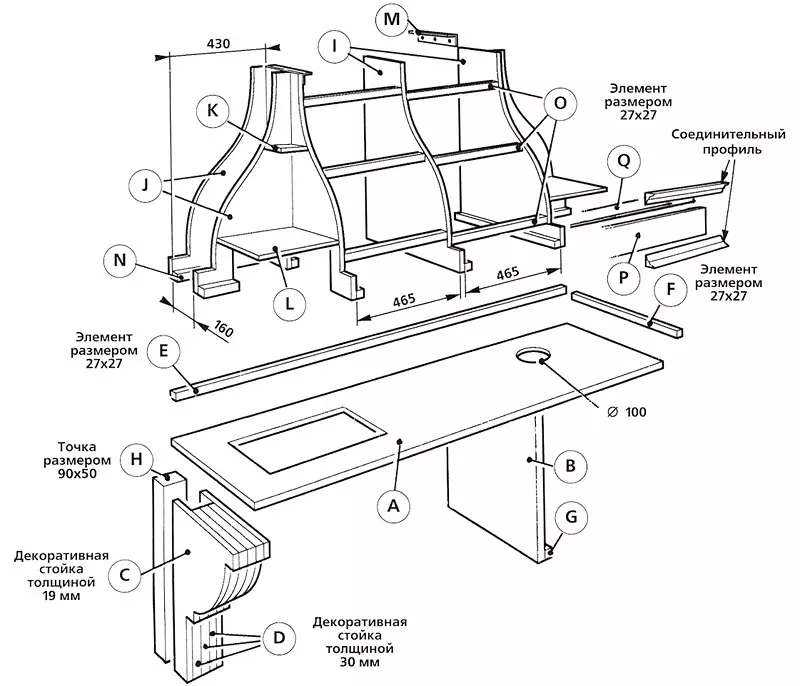
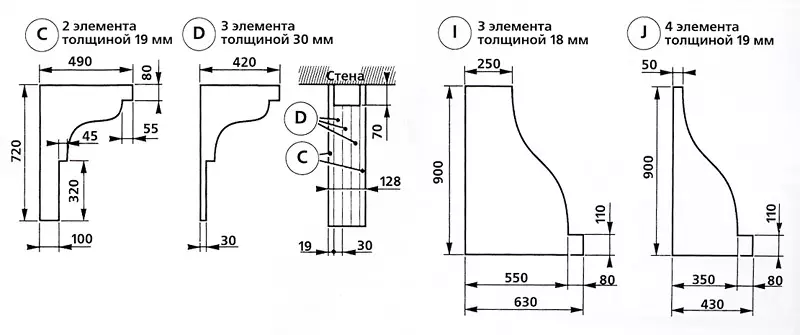
Supportive base surface is made on the basis of a chipboard of 19mm thick, plywood or oak panel. For convenience in further operation, they are better covered with varnish or water-repellent paint. The intensity of the surface size is 6301850mm. On the part located above the surface of the plate, right in the center it is necessary to do a rectangular hole for fixing the filter structures, the dimensions of which are set by industrial manufacturers of kitchen ventilation exhausts.On the right on the spot intended for the built-in oven, it is necessary to do the hole 100mm to install the air wire. Panno is maintained using a stack installed in space between the stove and the limiter. In order to make a rack on the left, you need to cut the necessary elements from the chipboard on the stencil. You will need two 19 mm chipboard sheet (elements) and three 30 mm chipboard (elements). After all the elements are drinking, glue is applied on them, they are applied to each other and connect with a bolt with a embedded cap and nut so that the central poloz is formed behind the rack, allowing it to attach it to the wall. The front part of the rack is skred. The panel is fixed using both frames and f, which attach screws to the wall and panel. The stacking is strengthened at the bottom using the plankg, and at the top, with the help of thin screws; A glued stand is put on a timber, screwed to the wall of screws with a flat hat.
At this work stage, filters, industrial extract and electrical equipment are strengthened. Ventilation output and filtering equipment are connected using two flexible metal pipes. In order to achieve a sufficiently elegant, the pear shape of the drawing is needed the upper partitions, drunk from the same 19-millimeter chipboard using stencils, three racks and four racks. On a flat surface, they are connected to each other to achieve a durable, smooth support. The nutscape is glued and fastened with screws two racks. The same operation is repeated from the opposite side. Then the created parties are fixed with the help of sampling and L, which are attached with screws on both sides. It should be done only after fitting. From above on the racks impose corners, which they are fixed on the ceiling, and the corner on the bottom of the racks are attached to the panel. To the center, also with the help of the corners, attach the third rack, and all three racks are connected at different levels with the help of planko.
Finish
The entire upper part is covered with a fiber fluid thickness of 3.2 mm. This material allows you to hide some angularity of the structure. For greater strength, elements should be pre-closed with dense paper, the fibrovolok should be put up the structural side. All joints, irregularities on the surface are processed several times with putty and align. Structure-forming elements of the panel are hidden using the panel to which the shelf is put on.
Hats of screws and joints after the putty dried, once again need to check and finally close. The upper part is covered with matte white waterproof paint in two layers. You can separate the front panel, the wall under the panel, having stuck with a tile of one color. The panel looks good oak lacquered baguette. The figured rack is covered with waterproof paint in three layers. In order for the extractor to do not look completely alien in the kitchen, you can change the finish and pick up the same tile as in the whole kitchen, as well as tint the waterproof paint. The width of the profile panel - 11cm, which allows not only to fix the tile 1010cm, but also to screw the baguette.
Our advice
To avoid deformation from moisture, it is preferable to use a chipboard for an outer finish, and polyurethane glue or glue for external vinyl-based glue should be used to connect panels from chipboard. Of course, for greater confidence, you can apply the dye and on the internal panels, and on the inner side of the fibrovolok so that there is no destructive impact of moisture. However, this will increase the project implementation time.
Extraction time of the exhaust - 3 hours.