
Features of "Venetian plaster", surface preparation, coating technology. Master Tips.

Plaster - extremely resistant coating. Watching 3000let backs of Egyptian pyramids are still happy with scientists and tourists. One of these ways to finish the walls, imitating natural materials, has been preserved since the time of the Italian Renaissance was raised their net creations. Maybe therefore this plaster and called Venetian.
Features of "Venetian plaster"
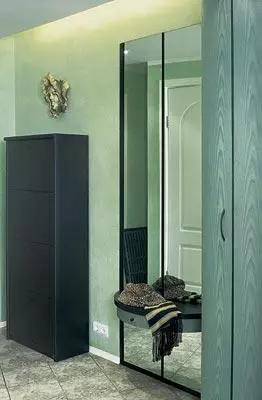
Modern covers of the type "Venetian plaster" are created from calcium-containing natural materials and a polymer binder. This is the point of contact of the aesthetics of antiquity and the pragmatic functionality of the modern decor. Such a coating makes the interior simultaneously both solemn and cozy.
Consisting of fine particles (powders) of marble, lime, gypsum and polymer binder on a water basis, they are environmentally friendly, odorless, wear-resistant, waterproof, easily clean, fireproof, technologically, dried quickly. Usually covers are sold in ready for use, but a number of firms prefer to supply the main material and the dye separately to expand the color gamut at the request of the buyer.
Brilliant or matte finished surfaces are obtained in different ways. For some types of coatings, it is necessary to apply a thin wax layer of a certain composition, and for the other, sufficiently energetic smoothing of the surface with the steel spatula. In the event of the case under the action of heat released by friction of the tool on the material, the polymerization of the binder occurs and a durable thin crust is formed on the surface, brilliant or matte, depending on the coating composition.
Required tools
For finishing works, you will need two stainless steel ironing widths 250 and 200mm wide, spatulas: wide (200mmm) and narrow (60mm). The working edges of the tools need to thoroughly round and polish. Maclithic and flutz, roulette, long ruler, level, pencil, syringe-dispenser, measuring glasses, tanks for stirring materials, stirrer, stepladder, water bucket, grinder (N120 and N220), grinding grater, "duck" - a device for obtaining a wide paper tape with adhesive edge (with its absence, a paper strip and sticky tape can be used separately).Preparation of the surface of the wall
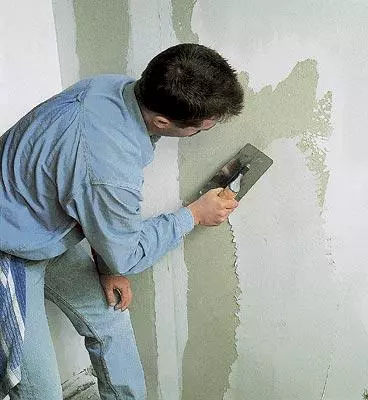
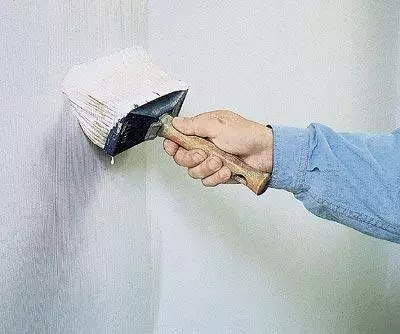
Smooth, smooth, durable surface-prerequisite for the application of "Venetian plaster". The technology of preparing the foundation is the same as in the preparation of walls under the color. Slops putty from the surface need to be conded. Small recesses are allowed (up to 2mm). Then the walls should be carefully covered with acrylic primer into two layers so as not to leave uncovered places. Dried (4-6 hours.) The walls must be placed and saked along the boundaries with a protective paper tape.Expenses
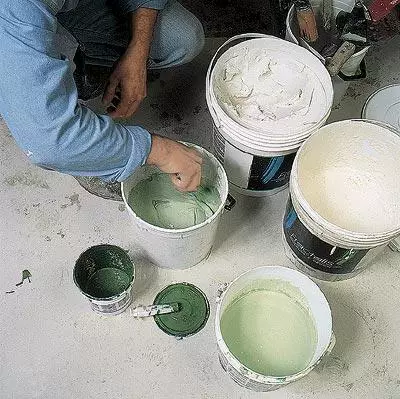
For decoration of the hallway with an area of 8.5m2 and the walls of 15m2, expenses were compiled on: putty (34kg) - 129rub., Primer (1.8l) - 71rub., Dye (0.2kg) - 39 rub., Basic Master MARMO coating base (12kg ) - 370rub., Top coverage Master Stucco (8kg) - 247 rub., Paper tape- 12 rub. Vitogue costs (excluding the cost of work) amounted to 583 rubles. It took 32 hours of working time to finish, and for all the work (surface conjunction) - 7 days.Application of "Venetian plaster"
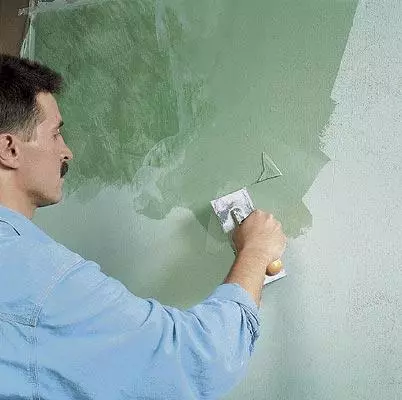
The essence of STUCCO technology is to apply several thinned layers of coating consisting of chaotic stains of the material. The technique of their application should be such in order to create a variable layer thickness and, thereby, is a smooth change in the tone in the spot (color stretching). The combination of a set of such spots and their layers creates the illusion of the depth of the pattern of natural material.
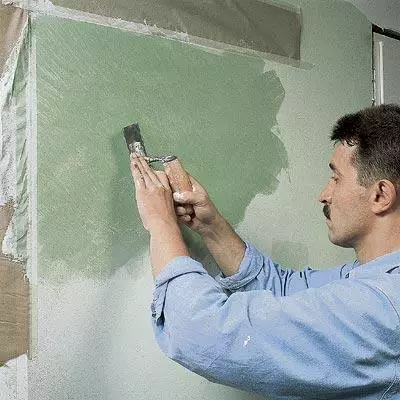
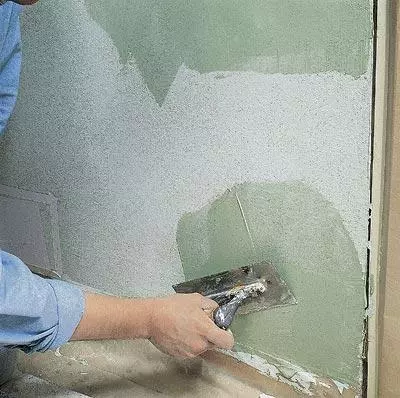
The first layer is usually performed from a material containing a marble thin grinding crumb (in the case of the Master Marmo brand) to ensure reliable clutch with the base. It is applied by a thin layer with a steel ironing or spatula just like a putty (flow rate of 700 to 1500 g / m2). After drying (4-6th.) The covering layers are applied to this layer creating the texture of the coating pattern.
If you need to get a matte coating, then the second and subsequent layers are performed from the same material "Master Marmo". If necessary, get a glossy surface - from the fine-dispersed material "Master Stucco", mixed with the selected dye (consumption 500-1200 g / m2 per two layers).
| After sealing the seams, treat the walls of the veteonitkr filling putty (at the rate of 0.6-0.8 kg / m2). The putty dries 6-8 hours. |
| Apply ARDFIX primer, diluted with water in a 1: 7 ratio, in two layers with a wide brush, thoroughly rubbing it with a light pressure on the brush. Leave to dry for 4-6 hours. |
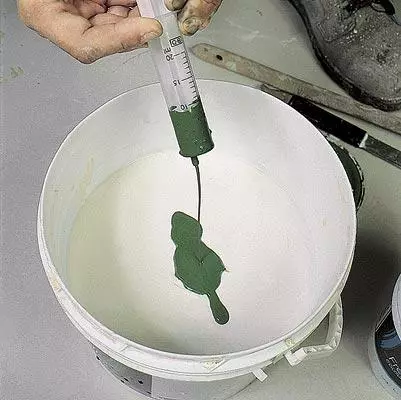
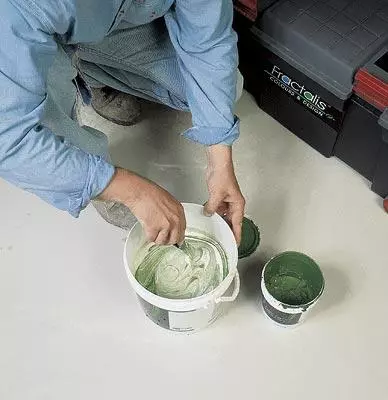
| Measure the desired amount of MasterMarmo material (at the rate of 800 g / m2), mix well and add the calculated portion of the GelColor dye, selected by the company's catalog (the largest consumption of the dye does not exceed 100 g / kg bases). |
| Mix everything thoroughly to creamy consistency. At the end of the work, do not forget to put a syringe-dispenser and a stirrer in a bucket with water. |
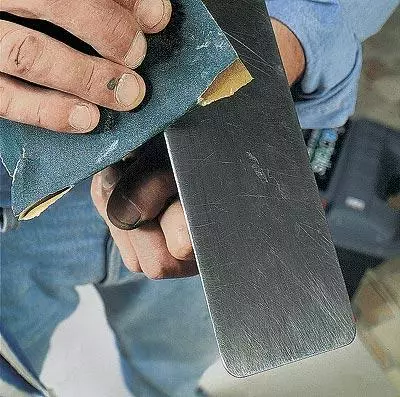
| Round all edges on the working surface of glades and spatulas fine-grained grinding skins and polish them until it removes visible defects (scratches, burrs, etc.). |
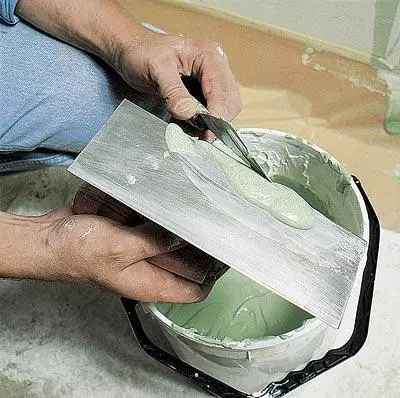
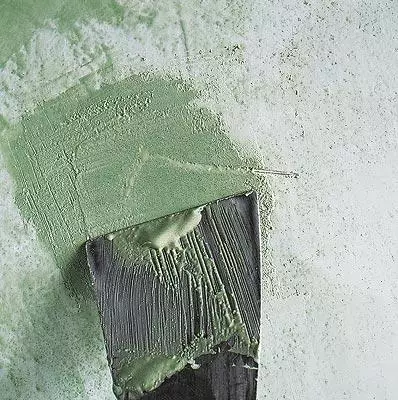
| On the working surface of a long ironing (length250mm), impose a spatula of approximately 70-100 cm3 MasterMarmo material. |
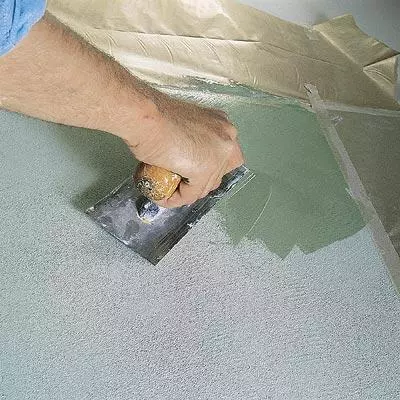
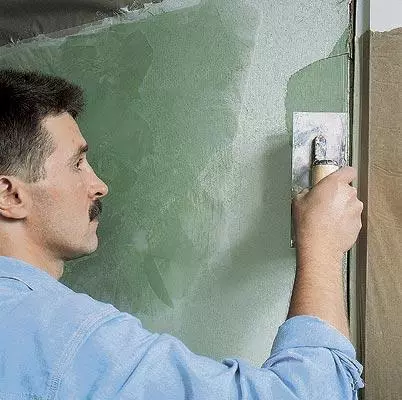
| Start work from any upper angle: Apply the material with a uniform layer in the same way as the putty is applied, i.e. Slipping it moves from below-up and to the side. |
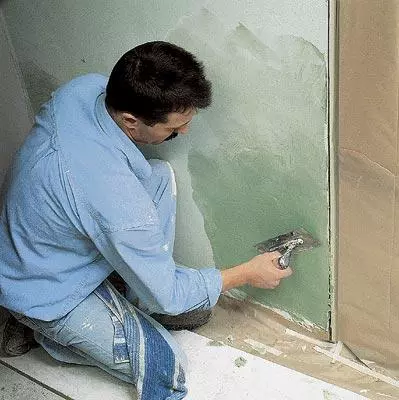
| Expand the material on the parties in multidirectional movements. The ironer press the wall tightly, holding it at an angle of 10-15 to the surface. Try not to leave spaces. |
| Plots at the floor cover the movement from below. By covering all the walls, let the material dry for 4-6 hours. |
| Measuring the desired amount of Master Stucco brand covering material and mixing it, add a dye and mix all times well until a homogeneous mass is obtained. Note that the error in the amount of dye then will force the extra layers with the "corrected color". |
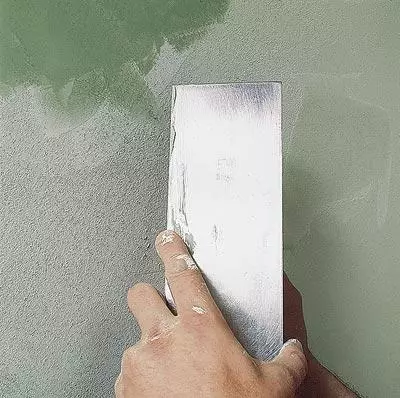
| Along the edge of the short ironing (length200mm), impose a narrow spatula of about 30-50 cm3 Master Stucco material. |
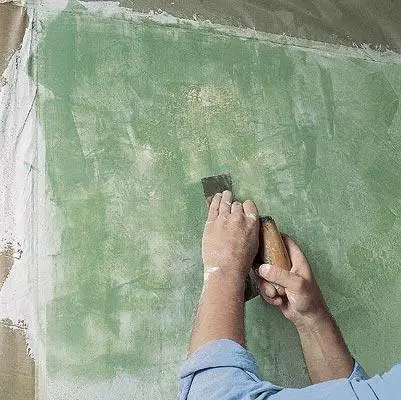
| Mold it arbitrarily arbitrary strokes using arcuate short movements (approximately equal flowing length). |
| The influx of the material that is assembled on the wall at the end of the previous movement, turn off the straightforward movement at an angle to the influx line. So, alternating the movement of spreading and overclocking and arbitrarily changing their length and direction, cover a plot of approximately 0.70.7m. |
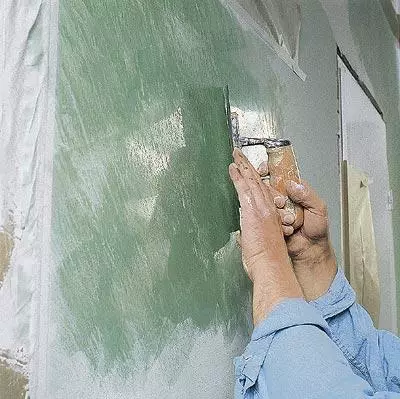
| Spite the coating on this section with long movements in arbitrary directions before the formation of a uniform thin layer. Push strength and tilt plane tool can be slightly increased (up to 20-25). |
| Every 2-3 movements, clean the smoothness from the sticking material, and then wipe it slightly damp cloth. |
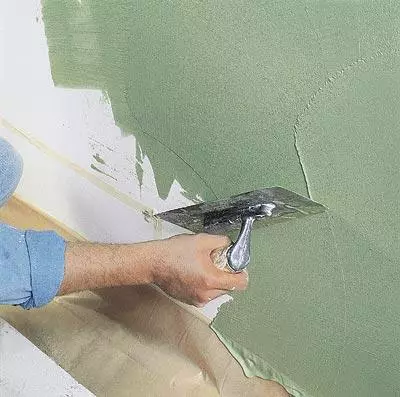
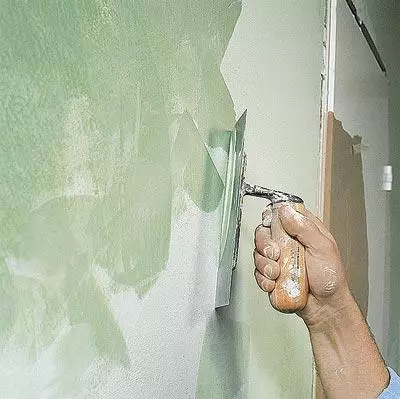
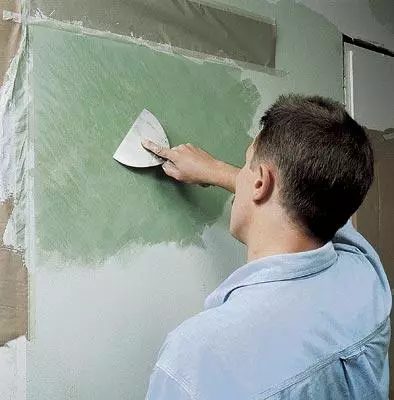
| Having finished raking, wait a minute 10 and start the coating with the edge of a wide (200mmm) spatula slightly by intersecting movements from above-down. As the gloss is the appearance of pressure on the spatula, weaken not to damage the resulting thin crust. |
| Finally, look through the surface, smoothing it with a clean ironing, strongly pressing on it with two hands and keeps at an angle of 5-12 to the wall plane. |
| Repeat the entire cycle of applying material smears, acceleration, leveling, hardware and glossy in the neighboring and subsequent sections. |
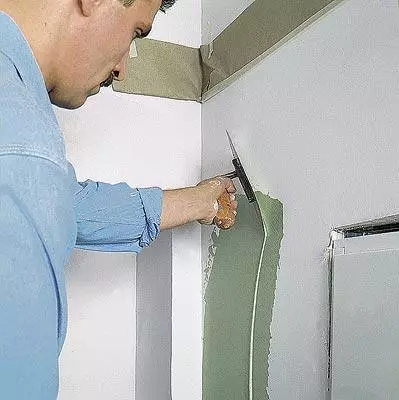
| At the boundaries of the walls, obstacles (corners, openings, protrusions, etc.), start the movement of smears, putting the edge of the smoothness on the border line, and continue inside the site. |
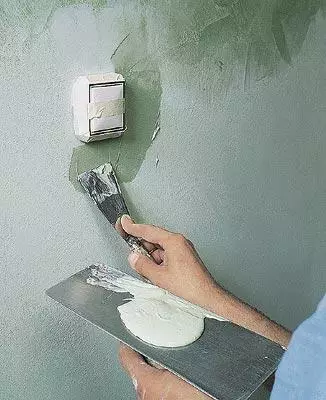
| In uncomfortable places for fading and leveling of the material, use a narrow spatula. |
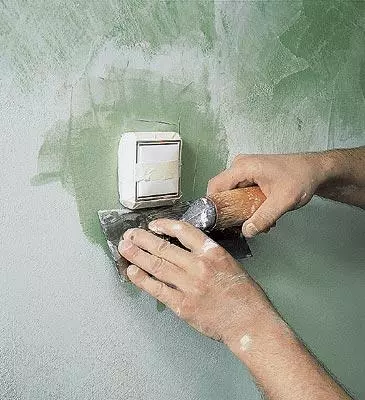
| Coating around obstacles smooth out and glove by a short ironing movement from the obstacle inside the site. |
| At the floor, the coating applies arcuate movements of ironing, starting below. |
| When glossing a section of the floor of the movement of the ironing, send from the bottom-up and slightly cross them. |
| If, after receiving a gloss on the entire surface of the wall, the result did not like, not allowing the coating to dry, apply the second layer of Master Stucco material arbitrarily located stains and repeat the entire finish cycle on areas of no more than 1M2. |
| If the surface is damaged during the work, apply the Master Marmo material around it with a narrow spatula, let it dry, and then cover and separate the Master Stucco material according to the described technology. |
| On a glossy surface, you can apply all new and new layers (you can different colors) until the desired result is obtained. |


The decoration leads areas from 0.5 m2 to 1 m2. In this case, four operations are sequentially performed:
- applying material smears (can be different colors);
- their leveling;
- smoothing the material on the area of the site;
- Surface glossing (polishing).
When applying push strokes on the smoothness at the beginning and end of the movement weakened (as when scraping), thereby changing the thickness of the material layer. Completely finished the work on one piece of the wall, the entire cycle of operations is repeated on the adjacent and so until the entire wall is finished. When smoothing and glossing, the movement of ironing should necessarily cross the boundaries of adjacent sections. The optimal technique of movements and pressure on the tool must be chosen for themselves.
If the resulting texture does not like, not giving the material to dry, apply another or more layers until it turns out what you have conceived. But remember that the best enemy is good, the main thing is to stop in time.
It is possible to touch the coatings through 6 hours, after a day, use the room, but the walls are finally dried in only a week.
Tips Masters
- Watch out for the cleanliness of the tools, after use, be sure to put them in a bucket with water.
- Protect the material from clogging, since all foreign particles are subsequently manifest themselves on the trimmed surface.
- In fact, you can control the text, changing the size of the ironing, the length of the smears, the gaps between them, the power of pressure on the tool and the colors of the base and the upper layers.
The editors thanks the Moscow company "Spectrum" for the materials and technical director of the company Dubovik Kirill Dmitrievich for help in conducting a photo report.