
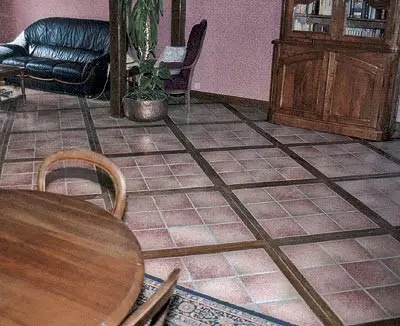
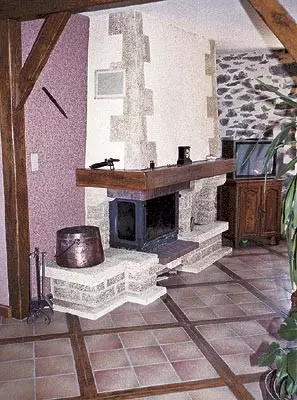
A detailed description of the floor paving technology by ancient French method: squares from ceramic or clay tiles framed by wooden frames.


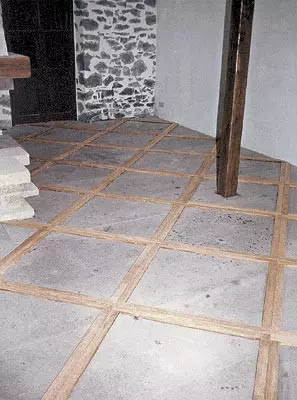

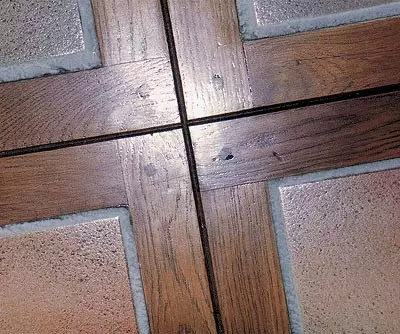
The problem of repair of the dilapidated floor was solved with the help of an antique method. The board served their period was replaced by squares from ceramic tiles framed by wooden frames. This type of floor paving (combination of wood and tiles) can still be found in some rural areas of old Europe
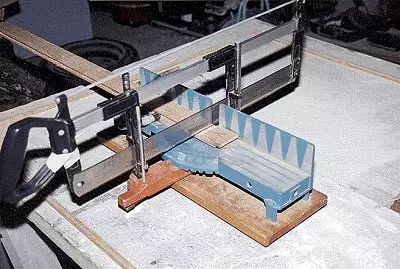
Minimum tool set
Portable Woodworking Machine (type mill)Hacksaw and stub (fixture for sawing at an angle)Drill
Framework
The frames are made of outcut oak or chestnut boards with a cross section of 5014mm and 875mm long. They must be square, and their size depends on the dimensions of the tile used. In the case - 25025010 mm. The thickness of the planks (14mm) corresponds to the thickness of the tile (10mm) plus 4mm-add glue. Based on the size of the room, the number of frames is calculated. We need to place along nine tiles (three rows of three). Of course, if you wish, this amount can be arbitrarily changed, however, it should be borne in mind that the framework should not be too small or too large; The optimal size is 1m2. To facilitate the work, we advise you to pre-draw the room plan in order to more accurately determine the consumption of materials and thus reduce the amount of waste. But, unfortunately, it is impossible to get rid of them.
You will need
Painted oak or brown strap cross section 5014mmWaterproof plywood strips (FSF or FC stamps) cross section 520mmPins cut from oak trimming
9 square clay
or ceramic tiles of 250250mm in size for each frame
Cement and polyurethane glue, transparent varnish
Chipboard of elevated water resistance (brand P - A, B, class E1) thick 22mm
The number of materials may vary depending on the size of the room
Assembling frames
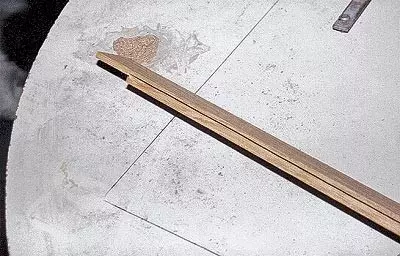
For each frame, four identical strips of 875mm long layers are unscrewed. Their ends are processed to connect to the Poltera (at a length of 50mm) with the help of hacksaw and stusl. The pressure is made from the opposite sides, namely: on the one hand, on the top, on the other, the bottom. On each bar in the middle of the edge that will lie on the outside of the frame, the groove of 5mm width and 10mm depth is milling. The insertion of a five-millimeter plywood, used to fasten the adjacent frames between themselves.
In the middle of the opposite edge of each strip using a single-generated milling cutter in 45 and a milling mill, a longitudinal groove (propyl) depth of 6mm and cross section in the form of a rectangular triangle is made. The frame should be collected so that the beveled part of the propils on all the boards has been addressed to the floor. This triangular groove plays a double role: drilled three-million holes perpendicular to its inclined wall, you can arrive the frame to the base from the chipboard with a diameter of 325mm; And in addition, when laying the tile, the grooves is embarrassed by cement glue, which provides the best tile grip with a wooden frame. The same groove creates a local extension of the adhesive seam, which reduces the risk of its cracking, since wood and burned clay have different thermal expansion coefficients. Ultrasound frames of the frame is removed by a two-billime chamfer at an angle of 45. This allows you to get small grooves in the form of the letter "V" between the framework, visually separating one from the other. The assembly of four slats should be carried out on a smooth flat surface. They must be accurately combined in the form of the right square.
The gluing is made by polyurethane glue for a tree, which is resistant to moisture, quickly expands when drying, filling the seams tightly. The joints of the joints are compressed by four clamps; At the same time, there are wooden gaskets between them and strips. The final finish consists in equalizing the end sides of the framework and thorough grinding of the entire design of the fine-grained abrasive skurt.
Laying frame
From the aesthetic considerations, laying the framework on the base of the chipboard is better to direct their diagonal parallel to the wall of the room. On the floor, make a marking line and arrive aluminum ruler on it. It serves as focus and removes when the first frame is pasted, and the subsequent is already attached to each other. Lower surface of the first frame Lick polyurethane glue using a spatula. Then, place it in the right place on the floor and screw with 12 bushes with a diameter of 325mm (P3 on each side), which are inserted into the holes in advance drilled in the inclined walls of triangular grooves. External edges The adjacent frames can be built with each other with plug-in planks of the waterproof plywood size of 520850mm placed on glue. All subsequent styling is carried out in a similar way.As a result of a diagonal pattern at the end of each row, it will inevitably need to trim the frame. Distance from the wall Measure the roulette, mark on the frame, and unnecessary spill.
When all the frames are brought to the base of the floor, each of them in four corners additionally attach pins to it. It will give the entire design of the finished look. Drill on the place within and founding the floor of the hole with a diameter of 8mm. Pins get by splitting oak cutting on a paler, give them a cone to them with a knife. Lubricate them with glue and hammer in a hole in the holes, and the overlap is cut into the knob to flush with a frame. Ginger the skin tracks from the hacksaw.
Before screwing, cover the frame with two layers of liquid insecticide-fungicidal composition diluted with a small amount of water-based tinting paint. This will make the tree in monophonic and will protect against the blackening caused by glue for tiles.
After the framework is dried, apply two layers of the semiamatic varnish on them, and then the upper side cover with a protective adhesive film (such as Scotch) to avoid hitting the cement glue on a tree.
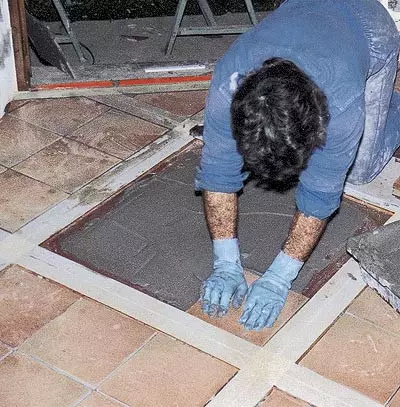
Laying tiles
Tile is placed inside the frames. Glue for clay or ceramic tiles and wood apply for the entire base area. Between tiles, between tiles and frame Leave the gaps of about 6mm wide. Every bag, slightly tapping the rubber hammer, on the layer of glue. Then left the gaps set by a special mastic, preserving some elasticity and "adaptable" to the deformation of wood after solidification.
After removing glue residues and grout remove the protective film. Then put oak plinths - the finishing stage is completed.
To provide the necessary sound insulation, waterproof, elastic rubber, strips of cork tree, etc., can be laid between the chipboard sheets and support lags, etc. In this case, the chipboard sheets should not be screwed into screws, but only to sample their tongue compounds. However, this method is suitable only if the distance between lags does not exceed 40 cm.
For a greater guarantee from noise, the space between lags is poured with sound-absorbing material of the type of clay, crumbs of cellular concrete, etc.