
Pattern of colored glasses on the ceiling, competently made and correctly highlighted, is very impressive. The implementation of this idea on the example of an oval lantern in the suspended ceiling.

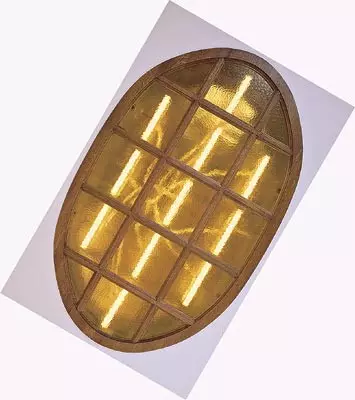
What we suggest you use as an idea is not a lantern in the strict "architectural" sense of the word. This is rather successful imitation, which is possible and affordable thanks to modern materials and technologies.
The lantern part of the roof, which includes glazed opening for the passage of daylight into the room, which is limited only by the inner walls.
Plugs V.I. Terms of Russian architectural heritage: Glossary Dictionary, 1985.
To implement this idea, it is necessary to have a room that allows you to mount the suspended ceiling. There are several types of lamps (incandescent, fluorescent, halogen) in a vane, stained glass lamp. The design of a wooden (or other) frame allows you to change the glass without much effort - for this they are enough to accurately lift and insert into the groove. You can also diversify your interior from time to time, creating new stained glass windows. Pattern of colored glasses on the ceiling, competently made and correctly highlighted, very impressive. With a sufficient imagination and the availability of certain funds, you can safely experiment with the ceiling lantern, not forgetting about the taste and sense of measure.
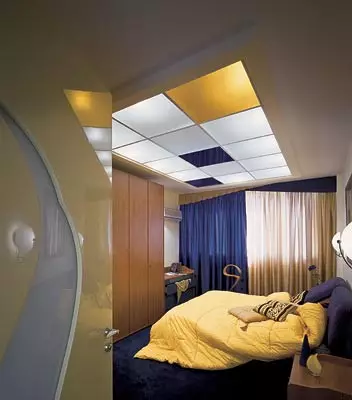
Where is it better to apply the ceiling lamp?
It seems that it will be expressive in the bedroom. When you conveniently settled in bed, your attention will attract non-smooth monolith ceiling with a lonely chandelier or other traditional luminaires, and a rounded (or other form), luminous "panel". It will be an extraordinary designer solution in a spacious hallway.How to implement such an intent?
Manufacturing a wooden frame under the ceiling lamp is best trusted by specialists. Himself manually make a bent sidewall with smoothly spinned surfaces difficult. Therefore, based on the size of the room, the sketch of the ceiling lamp should be drawn (it will take the area of about 2-3 m2) and order for him a frame at the woodworking enterprise. When it is ready, you can pick up the lamps and order the glasses. Power supply of electrocabilities is made before mounting the frame.
First of all, you should make a pattern of a flashlight from cardboard or fine organity. All the sizes of the frame and the point of connecting the ceiling bracket are transferred to it. The outer edge of the template corresponds to the internal size of the shelf of the wooden frame, to which the sheets of plasterboard are stacked. Then the template is applied to the ceiling, and the places of connecting the ceiling brackets are noted the pencil. For this markup, the ceiling plates are drilled and the reinforcement of the anchor bolts, evenly distributed around the perimeter.
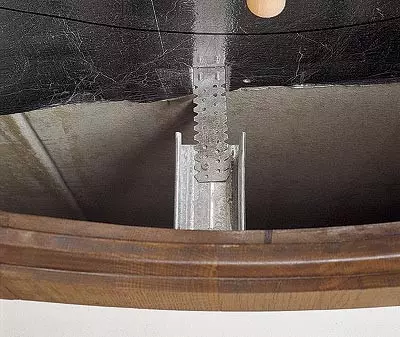
Their number corresponds to the number of fastening brackets (8-10 pieces or more) depending on the volume and weight of the frame. Anchor bolts are taken at the same length (approximately 200mm). Thread under nuts mounting - M12 (since the load is large). The carbide drill is made by holes in the ceiling plate, and the anchor bolts fixed with a durable concrete, fixed vertically and having a departure length of 8-10 cm. After soaring the concrete (after a day), it is possible to start the mounting frame.
Installation of the ceiling lamp
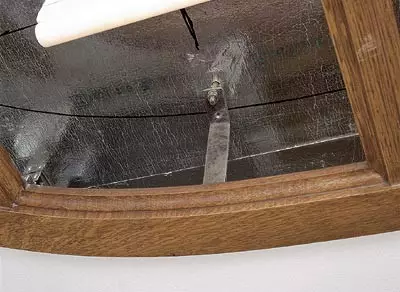
The initial stage of installation is the strengthening of wiring for lamps. At the site of fixing the frame on the ceiling, a sheet of pholoisol is glued, which performs two functions: serves as a reflective surface and hides under electrical wiring. The sheet is cut with such a calculation so that its edges on the ceiling overlap the outer contour of the frame by 15-20 cm. By gluing the pholoisol and fixing the lamps, you can start the wall frame of the ceiling lamp. Such an operation as the installation and fixing frame will require the help of strong men, since the design is sufficiently heavy. The frame is put on with brackets on the anchor bolts and is fixed with several nuts (Cup M12). It is necessary to set and fix the frame at the construction level (the battery is unacceptable) is important for the installation of a suspended ceiling. The distance from the frame to the ceiling plate is approximately 20cm and the light will penetrate well, and the glasses will not overheat and crack. Now proceed to mount the suspended ceiling. It is attached to the main on direct suspension and framework from PP (straight profile) made of aluminum. Tiga-Knauf suspended ceilings are sold complete with aluminum profiles and suspensions.
Your task will set the frame from direct profiles so that a sheet of drywall is fixed on it, joined the ceiling lantern, it lasted on a wooden frame shelf with its outer edge. Therefore, fixing the frame, it should be set it up so that the distance from the shelf of the wooden frame to the ceiling plate was equal to the distance from the ceiling plate to the lower plane of the aluminum frame plus the thickness of the plasterboard sheet. Sheet joints must be on the direct carcass profile. Under the ceiling lamp sheets of plasterboard are cut on the manufactured pattern so that their edges are closed by the outer edge of the wooden frame.
The aluminum frame of the suspended ceiling to the main mounted on direct suspensions, the gaps between which are 60-80 cm. Sheets of plasterboard are attached to the profiles of aluminum frame with screw-related screws with the help of an electrorewater. The seams are closed with putty.
The next operation will install lamps. Their power is selected with such a calculation so that the light flux evenly passed through the glass frames and illuminated the entire room. Connecting a part of the lamps to multiple switches, it is easy to adjust the light saturation in the room.
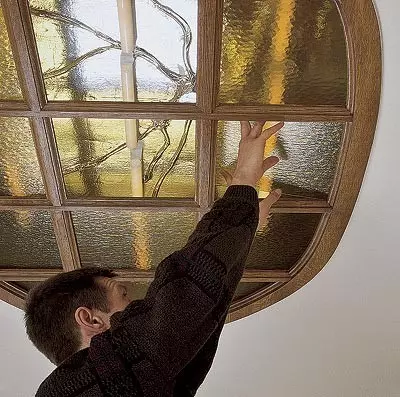
After installing the frame and the fastening of the suspended ceiling and the lamps can be started to install the glasses. They are cut into advance for the dimensions of the inner openings of the frame. Colors are carefully selected so that no poisonous or unnatural shades were obtained - this will largely depend on your comfort, so avoid gloomy colors. Bright yellow glasses should be used carefully. Gamma must be a tender, not irritating eye. Then the room will reign peace and comfort. The glasses are put in the order in which they were numbered, each should be located in its place. Glasses are inserted neatly into frame grooves from the edges to the center and are not fixed, they are kept by their own weight. If after a while they accumulate dust, cleaning will not make any difficulty.
Do not refuse the consultation of the stained glass artist, it will help you choose the desired shade of glass, harmonizing with the interior of the room.