
What if it does not rise a hand to throw away an old landing chair that belonged to the grandmother? Restoration of furniture with their own hands is not as difficult, as it seems at first glance.
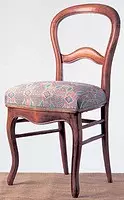
The technology of repairing upholstered furniture, apparently, never becomes obsolete, because it allows you to breathe new life in the old and launching the look of chairs, sofas and chairs. Of course, to purchase new furniture is much easier, but what should I do, if you don't get up to throw a beautiful vintage chair, which belonged to several generations of the family?
Compared to the repair of the sofa requiring knowledge and skills of a professional, update the chair is not so difficult. True, you will have to show abstinity and accuracy.
A complex of operations for repair of the seat of stool is called upholstery. The essence of the main stages of the work (hauling the braid, the installation of the springs, filling the filler, etc.) does not depend on the model and type of stool.
Tape and mounting springs

Then perform the installation of the springs, i.e. Install them on a stretched braid. Updated upholstered furniture uses the most diverse springs in size. If you are going to apply wooden wedges, then the springs should be 2 cm above their ends. When repairing the chair without wedges, pick up the springs in such a way that they correspond to the ready-made trimmed chair in height (the height is measured in the middle part of the seat).
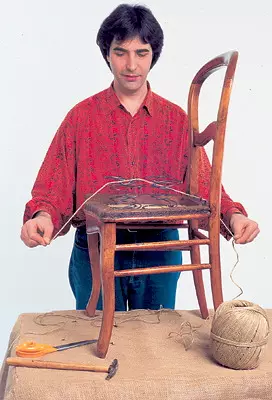
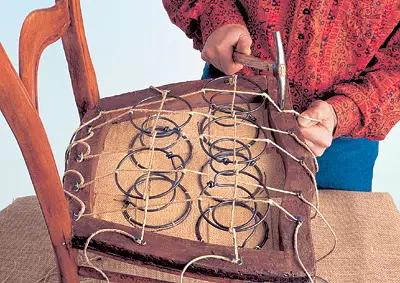
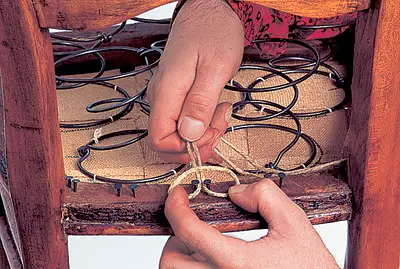
Distributing the springs evenly along the seat area so that they are located symmetrically relative to the central axis of the chair. The nodes on their upper terminals (or circles) must converge towards the seat center. Spring Springs to the braid, then tie them with two twins, while from the first make a loop, from the second (it is also called "returnable twine") - nodes.
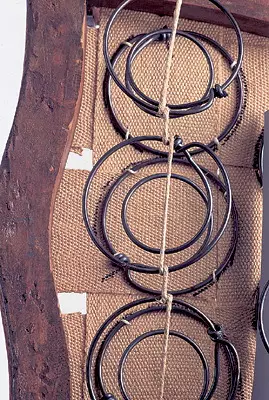
Tie the springs by the twine in such a way that in the back of the seat they were lower than in the front. Then additionally secure them with an intermediate cord and close with a dense cloth, sewing it to each spring and having nails to the wedges and seats crossades.
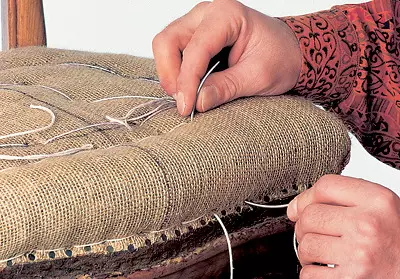
Using the needle curve and cord, apply the first seam to the tight fabric to 3 cm from the edge of the seat, then perform two or three sutures of smaller sizes. Ushnurov Leave free ends about 3 cm for fastening the hair filler (usually vegetable origin).
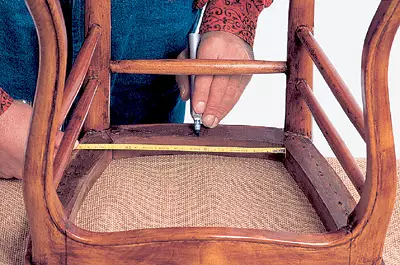
| With the help of a roulette, take a middle of the front and rear seat crossbar and define its central axis. Calculate the necessary length of the braid. |
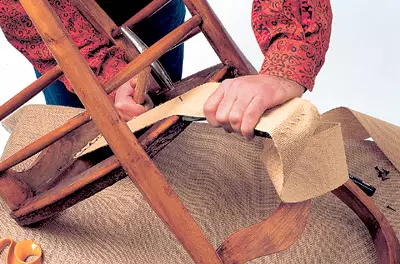
| Place the bracket along the axis, leaving the edge of 2 cm. Turn it and pulling it, lift it with nails (every 14mm) to the front seat crossbar. |
| Cut the brain as well with 2 cm march, fold and adjust to the rear crossbar. |
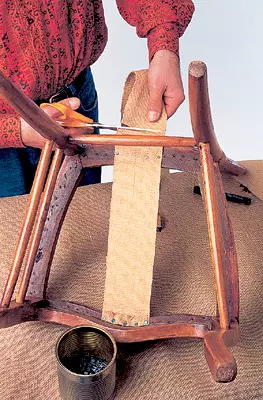
| Similarly, fasten some more band bands so that they formed a basket weaving and completely covered the lower surface of the seat. |
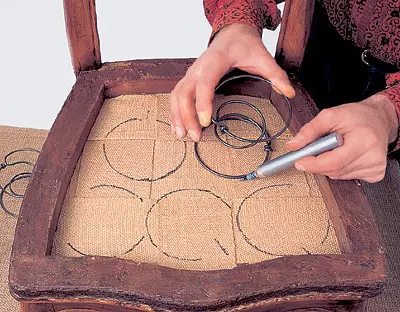
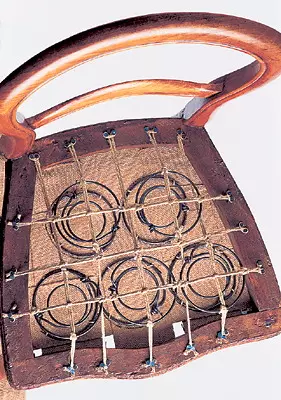
| In a certain order, install the springs, while the nodes on their upper circles must converge towards the seat center. Then circle the springs with a felt-tip pen. |
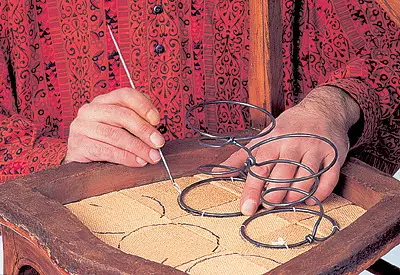
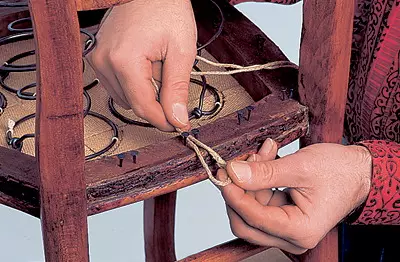
| With the help of a straight needle and linen cord, enter each spring in four places, starting with their rear parts. All springs secure in one cord and at the end of the work, make it a knot. |
| Prepare two twins for two rows of springs (each of them should be longer than the stool width is about one and a half times). |
| Turn the springs of each row of the twine, shifting it the two opposite points of the circle. The edges of the twine will secure nails. |
| Transverse stretch Start from the front. Springs are torn in such a way that they have a slope toward the back of the seat (the adjusting direction is tightened with the same tension of the twine). |
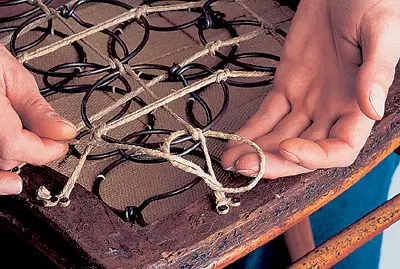
| The remaining ends of the twine make a node on each loop as shown in the photo. Tighten the nodes and secure the twine. |
| Finally fix the position of the springs in the horizontal plane, tied the intersecting rows of the twine. We recommend strengthening the design with additional intermediate cords, extended and tied between the rows of springs. |

Staying of the twine under the springs
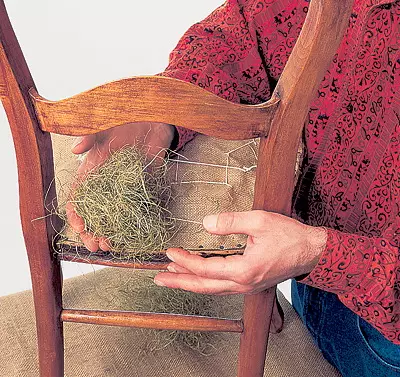
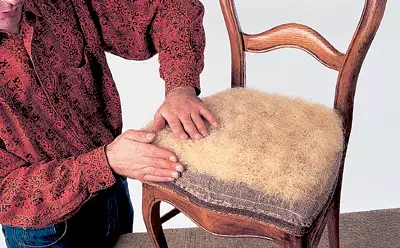
Washing with hair filler
This is the most difficult operation - filler must be put in a certain way that the seat acquires the appropriate form. It is imposed with a thick layer, and in front of the chair, the thickness of the layer must be greater than behind.
At the beginning of the filler beams to lay the seat perimeter. After pre-having it and removes too thick and solid fibers, filling the cord filler. Each previous bundle is connected to the subsequent so that it turns out an uniform and homogeneous layer. In the last queue, type the central part of the chair, avoiding to impose too much. Lightly pressing the filler with the palm, make sure that the layer thickness does not exceed 2 cm.
| Verify the bunches of the hair filler throughout the perimeter of the seat. Drop, twist and fill it under the twine. Each bundle is connected with the previous one, placing the fibers so that it turns out a layer with a uniform density. |
| In the resulting "gasy" in the central part of the seat, lay a bed with a thickness of 2-3 cm and smash. The front of the chair should be a little more filler than in the back. |
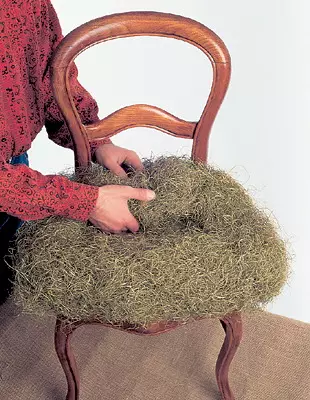
Creating a shell
The layer of filler needs to be "packaged" into the jute fabric. To do this, pull it out and attach it to the edges every 16mm. Singing such a shell filler give a form close to the shape of the finished seat.The shell fabric is held by the so-called "main points" firmware in 8-9cm from the edge of the seat. To secure points on the closing springs fabric, use a needle with a double edge. Perform an operation to start around the perimeter and finish in the center.
Consistently tighten the main points several times, thereby fixing the filler and the shell. After that, roll the cloth on the corners of the wedge, cut off the extra layer and wrap under the filler. To temporarily fix the shell, use large pins.
With the help of a special selection, scam and compact the hair filler. After performing this operation, you can already determine the general type of product. At this stage, you can also add or remove the extra filler to give the desired seed shape.
After you have formed a seat, proceed to its upholstery, in the process of which the volume and shape of the chair will not be changed.
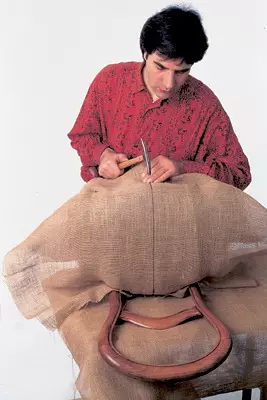
Dense fabric
Cut with a large margin jute fabric, put freely on the springs and enter each spring at four points. In the perimeter, secure it with four nails, then lower the edges and reconnect again every 2 cm.Note on the tissue points for cords at a distance of 3 cm from the edge. Between points should be 8-9 cm.
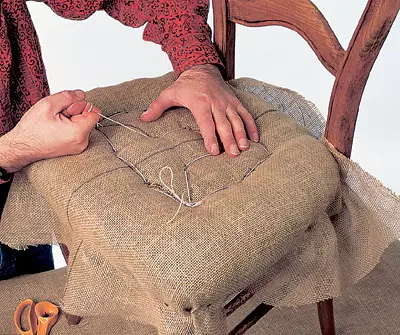
| Cover the layer of filler with a jooty upholstery cloth and forth the axial line on it. |
| Slip the fixed cloth with a needle with two episos (while the needle must go very close to the wooden crossbar). In 8-9 cm from the needle, take the main points. |
Firmating headset
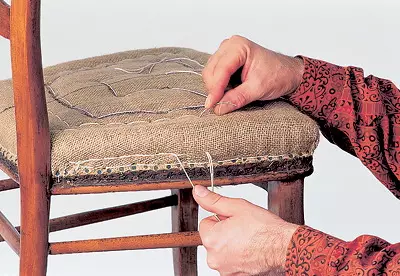
The purpose of this operation is to secure the shell and make the final shape. The number of seams depends on its size. Two or three seam will give the seat rounded shapes, and five to eight are more pointed and elongated.
The first seam rub is approximately 2 cm on the main points, and the following sedsions of 2cm from the first one. Use curved needles of different sizes and linen cords for operation. As a rule, the first seds are called straight, and the last, bordering cushion of the seat, - insertion or tie. Straight seams need to be pulled moderately and evenly, and the punching is more vigorously to get a hard edge.
After you have sewn, loosen the main points and slightly lift the central part of the pillow. Using the cord, perform another 2-3 seam parallel to the perimeter. This will allow you to apply the latter, adjusting, layer of filler necessarily animal origin to smooth out irregularities.
The result will be a very elastic pillow, not crushing and preserving its forms. Place the filler throughout the perimeter, paying special attention to filling the voids formed when laying seams. After weakening the main points in the center, the layer should be thinner.
| Watch the needle seat around the perimeter. At the same time, the cord must remain inside the chair all the time. When the needle's ear will start walking freely, push it so that it goes about 5mm from the previous point. Thus, position the entire perimeter and the central part, then tighten the points. |
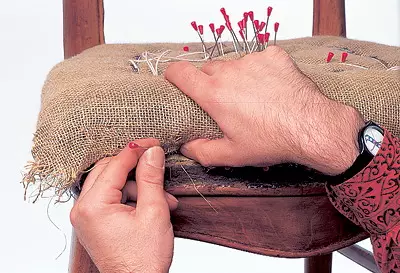
| Send the material on the edges and secure the pins. Selo sewed screeching the filler so that it turns out a dense and uniform styling. |
| After you have achieved the desired seat shape, pull the tissue and firmly adjust it throughout the perimeter (through each centimeter). |
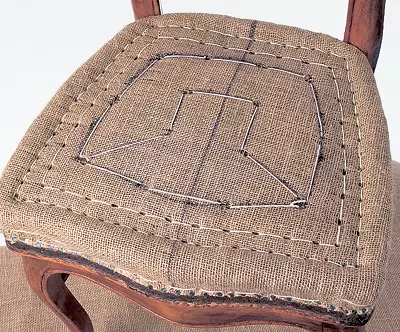
| Make the first point of the firmware on the concentric line 2cm from the main point. Seam is performed at an angle. A needle stick into the horizontal surface of the chair, and pull out in the vertical. |
| Make some similar direct seams located apart from each other at a distance of 1.5 cm. Then proceed to the last, custod seam. Tie and tightly roll them, starting from the first to the last. |
| The punching seam should be strong enough. At this stage, you can weaken the main points to give a "slack" of the central part of the seating. |
| Fill the voids formed in the seams, hair filler and form the final shape of the seat. |
Outing fabric
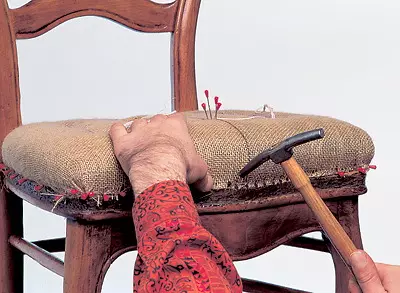
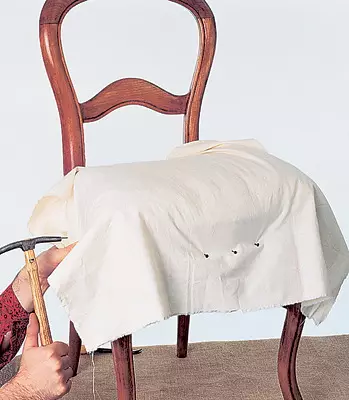
In the course of the next operation, a white fabric should be applied, which will close and fix the filler of animal origin. In addition, it will eliminate irregularities that have arisen - for example, it can be tightened in the place of the formed hump. Take this fabric into the grooves and pull on the racks, then fasten with nails every 6mm to finally align the seat.
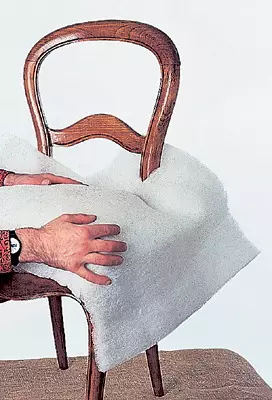
Cover this cloth with a cotton wool layer and take it around the edges, lowering the grooves. She will also give the opportunity to smooth out minor irregularities.
| Cover the seat surface with a wide cotton cloth and secure it in the grooves. Before finally fix it with nails, stretch the matter well. |
| Squeeze the wool layer on top. Take it around the edges and close the finishing cloth. |
Upholstery decorative fabric
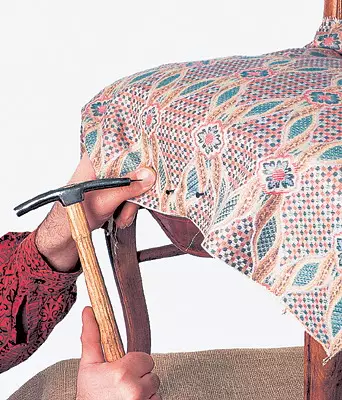
The last stage is the upholstery of decorative textile, similar to the operation of the finish with a white cloth. Decorative tissue is tensioning so much as it allows its elasticity. For upholstery, only special furniture fabric is applied.
Regardless of whether there is a drawing on it, on the upholster, orient to the central line to correctly determine the direction of the threads. The fabric can be fixed with glue, nails or adjust along the edges and kill with decorative buttons. In the first place, impose a batter or chopped fabric from the bottom of the chair to protect against dust.
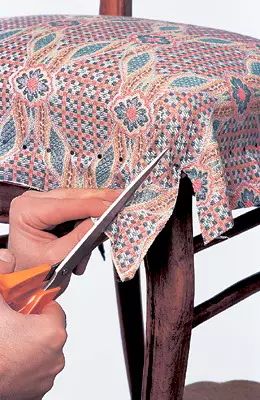
| In principle, decorative tissue is superimposed as white, but here you can make a mistake. To determine the direction of the filaments of the fabric or pattern, focus on the axial lines of the seat. |
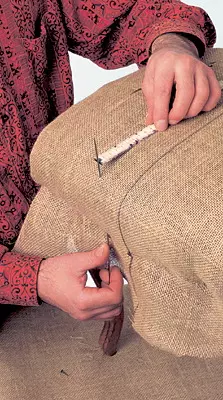
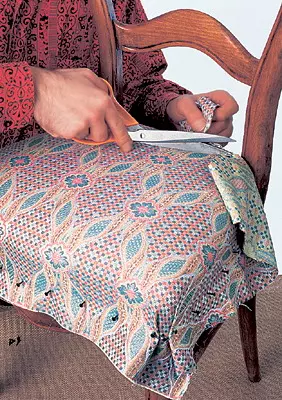
| After you pulled the fabric, cut her corners in the area of the chair's legs. At the same time, the ends of the scissors should be directed toward the center of the seat. |
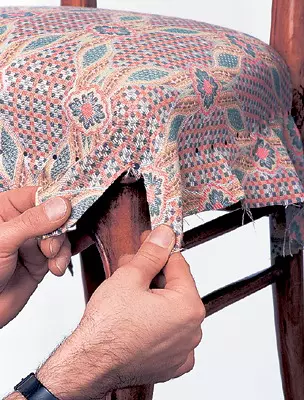
| Put the cloth and finally secure nails. |
| Fold the furniture fabric to the fold, then fasten with nails. This finish is most characteristic of chairs with rounded corners. If you want to get a more pointed form, then make a simple fold. |
Fixing decorative ribbon
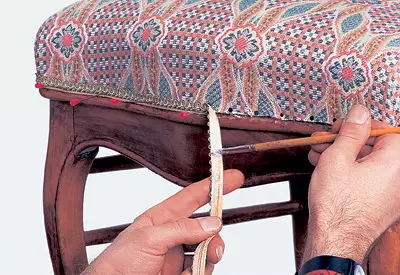
Start applying the tape on the side of the angle where there are no folds. Stick it gradually, leaving with a small bruster nails with glue as the tape is applied. Every 5 cm fasten it with clothespins that remove after the glue dry. Get the ends of the decorative tape.