We tell what liquid wallpaper is, what kind of walls they require and how to properly apply them.

In our article we will tell you in detail about the preparation of walls under the liquid wallpaper with your own hands and their further applying.
All about liquid wallpaper
Features of the materialPreparation of walls
Basic breeding
Application
Features of finishing material
Liquid wallpaper is called one of the types of decorative plaster. Its base is a fiber of silk or cellulose, the latter are a bypass product of wood processing. For beauty, manufacturers add various dyes and decorative elements, such as sparkles. The third mandatory component is CMC glue, which is often used for sticking paper wallpaper. It is needed to connect all the elements together. The final result is very similar to good quality wallpaper, this is due to the name.
The advantage of the liquid composition is that they can be applied almost on any surface, even if it has an unusual form. With the help of them make interesting accents, we think over the unusual design of space.
Cons There are also: the material is quite expensive and requires a thoroughly prepared surface. Accordingly, you will have to spend money on primer and putty. If the surface is with large irregularities or poorly processed, the texture will sooner or later become visible.
How to prepare walls under liquid wallpaper
To make the mixture smoothly and beautiful, it is important to achieve a homogeneous surface that would not absorb moisture and had a one-knight shade (preferably white or in the color of the coating). It also should not be holes with a depth of more than 2 mm and other shortcomings.Procedure of work in the preparation of walls to liquid wallpaper
- First remove the old layers of paint and plaster. Do not be lazy, when applying liquid wallpapers, the preparation of walls should be perfect, otherwise the beautiful result will not work.
- Also get rid of the walls sticking out of the walls: nails and other details.
- The reinforcement or pipes that cannot be removed, be sure to handle: can be put on top of a layer of putty in 2 mm or coat oil paint.
- Next, align the walls. Get rid of small recesses, they can spoil the final result. It is not necessary to make a perfect smooth coating: if the wall in the room is under the tilt, spend the forces to fix a shortage of the lack of useless. In addition, the liquid coating will not emphasize such a curvature.
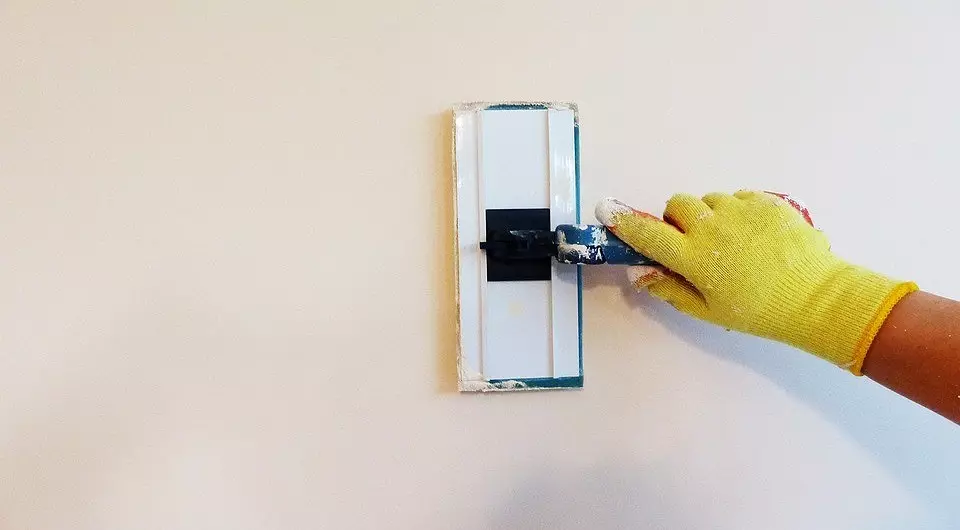
- Apply a smooth layer of plaster putty. Conducting and plasterboard partitions. Do not save and apply the material on the entire surface, and not just on the joints and irregularities.
- Make sure the walls are aligned, and proceed to the primer. Buy a standard version with deep penetration into the texture. Apply it in several approaches, in between them, let's dry for 3 hours.
- After the primer, prcribsente walls again with a special thick putty under the liquid wallpaper. Also for these purposes can be purchased white water-emulsion or facade paint.
Preparation of liquid wallpapers for applying
Start working with liquid wallpaper is better in advance - at the stage of grinding walls. Usually, in order to dilute them, it takes about 6-12 hours. In the package that you bought, most likely the composition of three components: the fibers of the base made of cellulose or silk, sequins or other decor and dry CMC adhesive. These ingredients can be packaged in different sachets or be mixed with each other.
In the case of a separate packaging, you will have to mix content yourself: take a large bucket or other container and mix the base with glue. Try not to create lumps at the same time. Decorative fillers, such as sequins, colored powders, granules and other ingredients, it is better to add immediately to the water - it will be easier to achieve a uniform distribution.
If you bought a package with a ready-made powder, it should also mix and make sure that there are no mercated parts in it, in this case, the solution will be more uniform.
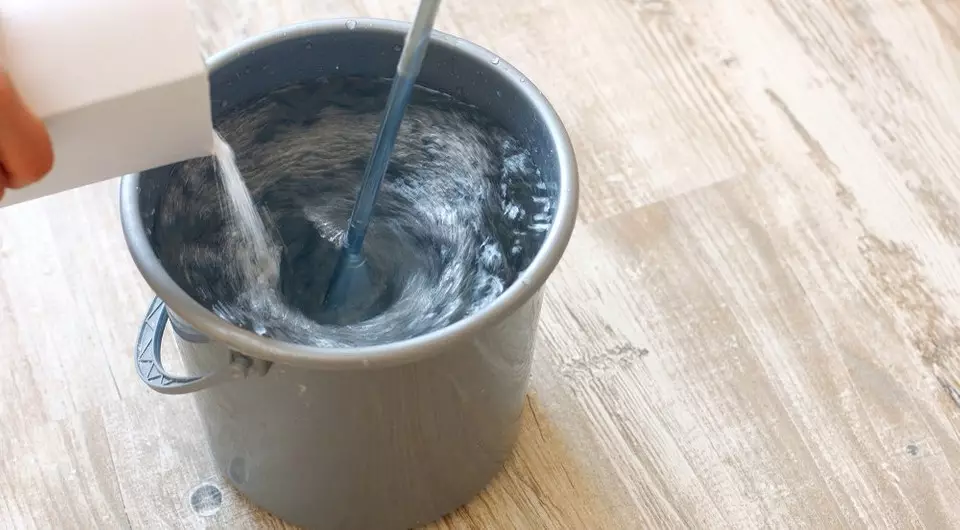
- Pour the desired amount of warm water written on the package into the container. Do not trust the proportions specified on the Internet, the manufacturer exactly the necessary volume of fluid is accurate.
- Add a prepared dry mix into water. It is better to breed each package separately, it's easier to comply with all the recommendations. Do not share the contents of the pack on the part, as you can disrupt the proportions and risk spoiling the color or homogeneity of the wallpaper.
- Stir the mixture with your own hands - it is easy to control homogeneity. Do not fear, there are no harmful components in the composition, which will spoil the skin. On some packages it is indicated that you can mix the mixture with a drill and a special nozzle. However, so you can break too long fibers and spoil the material. Be careful and do not use the drill if the manufacturer has not written about this method in the instructions.
- Wait until the mixture is completely soaked with liquid and give it to launch 6-12 hours. The exact time must be indicated in the instructions. Such a long period of time is due to technology: glue should be soft and associated the basis.
- Mix after cooking all the portions of the mixtures so that one container with homogeneous contents.
Look at the instructions on the video how to cook with your own hands.
How much mixture should be prepared at a time
Experts advise to make a portion sufficient to cover the wall or room entirely, depending on the speed of your work. Usually 1 kg is enough to cover 3-4 square meters. m Square. It is better not to handle walls with different knees, their color may turn out a little different, transitions will also be noticeable.
Coating
How to work with liquid wallpaper and prepare the walls, we have already found out. The last stage remained - applying.Tools for work
- Trowel.
- Plastic or metal grater. Sometimes they are made with specially narrowed and transparent to be more convenient to control the work.
- Spatula (from 18 to 80 cm). It is used to perform appliques from several materials and interesting patterns.
Step-by-step instruction
Apply the coating is easy, the process is very similar to work with putty.
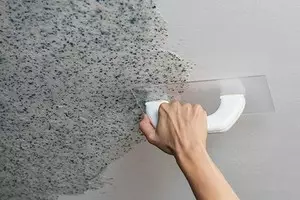
- Type the mixture with hand or spatula.
- Attach it to the wall and thoroughly smear. Focus on words in 2-3 mm. Check out the manufacturer's recommendations, maybe the layer should be thinner or thicker.
- Continue to lay out the mixture by adding new portions already distributed over the surface.
- After you posted a square meter of coating, crumple it with a grater moistened in water to get rid of irregularities.
If the solution sticks poorly to the wall, add some water: no more than 1 liter. on a pack. The tool with which you apply the mixture is better to keep a little tilt - it's easier to spread. If you want to achieve a homogeneous coating without drawings, do not change the directions when the mixture is laid. In the corners of the room, the solution is better to ram in the direction of the corner, and after pulling it out on the necessary direction.
It is not necessary to throw away the mixture immediately after you have finished repairs. It will come in handy if you find small flaws. Place it in a dense polyethylene package and carefully check. This storage method will allow a few weeks to be stored for a few more weeks.