We tell how to choose a heater and put it right to make a living room from the loggia.

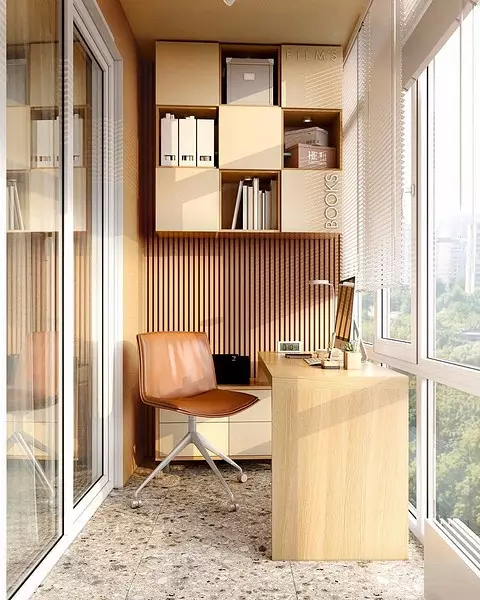
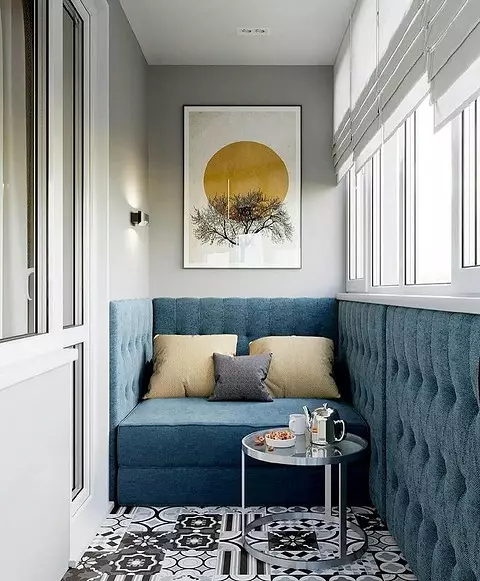
It is inappropriate to turn the loggia into the warehouse rarely demanded things, or even the frank trash. A little effort, and it will turn into a full room, where you can put the recreation area, the office, mini-gym, etc. We tell how to insulate the loggia.
All about the thermal insulation of the loggia:
Advantages of insulationWhere to begin
Materials
Instruction on insulation
- Ceiling
- Walls
- Floor
Advantages of insulation
- Improvement will allow expanding the useful area of the apartment. Additional square meters are never superfluous. Here you can equip the living room, the office, a small fitness zone or winter garden.
- Warm outline will save from dampness and cold. And the space itself will turn into a cozy and beautiful corner of the house.
- This is a reliable protection against drafts. Often in the room, to which the loggia is adjacent, colder than the rest. It will become a kind of buffer between the room and the street. Thus, a comfortable microclimate will be provided in the apartment.

Selecting a method of insulation
Riddling of apartments and climatic conditions will help determine how to insulate the room. South side and upper floor contribute to overheating. On the north side of the sun, a rare guest, so it is much cooled here.Ways of insulation
- Outdoor isolation. Hard insulation stacked outside. It closes the reinforcing mesh, a layer of decorative plaster. The benefit is evident - the inner space of the room does not decrease. However, outdoor work especially on the upper floors is complex and labor-intensives.
- Bilateral thermal insulation. The material is stacked outside and from the inside. The solution is very laborious and inappropriate. In fact, it falls twice to perform the same work. After all, one-sided isolation is quite effective.
- Internal insulation. The insulator is stacked from the inside, which slightly reduces the useful area. Through work, if desired, are performed independently.
In practice, the last option is most often selected, since it is the easiest and affordable. Outdoor thermal insulation is effective, but too complicated in the implementation.
In addition, in some cases, a local administration may need to conduct an outdoor isolation. It happens if the house refers to architectural monuments. It is good for the lower floors.
Selection of insulation
The selection of insulation is very wide. To navigate in this diversity, you need to know which criteria choose the coating.Criterias of choice
- Optimally, if it is non-hygroscopic or at least with minimal values for this indicator.
- Fire safety. Still, no one is insured against emergency situations, so I would like to secure maximum security.
- The durability is important to warm the room as much as possible.
- Another important nuance is the safety of the material. It should not distinguish toxic substances under any circumstances. If the manufacturer warns that it is possible when certain temperatures are exceeded, it is necessary to refuse to choose.
- Biost resistance makes the material with a reliable barrier against the formation of microorganisms and molds harmful to human health.
All insulators are divided into several groups.
Rolled insulation
Loose coatings produced in the form of stripped stripped rolled. Mostly, these are various wools: slag, mineral, glass. Before installation, they are linked, mounted in the prepared frame. Due to the loose structure, over time, it can be deformed by losing insulating characteristics. Significant plus is a low price.
Among rolled coatings there are thin foil materials, for example, a foam. They are used as an addition to the main insulation. The metallized coating reflects thermal waves, does not allow them to leave the room.
Slab
Dense plates of different thickness. This group includes very different insulators. This is a foam, polystyrene foam, penplex, compacted wats, etc. Convenient in the installation, are not deformed during operation.Sprayed
Liquid polyurethane foam is applied to the base using special equipment. After its hardening, a seamless insulated layer is formed. Equidata is stacked almost similar to a wet way. Both insulators have minimal thermal conductivity, serve dozens of years. The main drawback is the need to use special laying tools.
Instructions for warming in 3 steps
The course of work is determined by what state is located. Before insulationing the loggia from the inside with their own hands, start with glazing - it is necessary to install energy-efficient double-glazed windows. At this stage, it may be necessary to work on the masonry of the parapet. The new glazing will look more aesthetically, but warmer here will be only for a couple of degrees in comparison with the street.The fact is that this space by definition is non-residential. And therefore the walls, the floor and the ceiling are not able to fully save heat. And you need to decide how to pull the room. It can be infrared or electric warm floor. It is possible to install a heater.
Preparatory work
Start with preparation. Clean the old coating from the floor, walls and ceiling. Clean the released surfaces. Carefully inspect them. All cracks, chips and other flaws will have to be removed. They are neatly sealed with a spacion mixture, allow to dry completely, cleaned.
The joints carefully seal. Most of the inexpensive heat insulators are hygroscopic. The moisture falling into them accumulates, gradually destroys them and finish. Therefore, waterproofing is necessary. The jokes are sampled by a special ribbon or are wicked by mastic. After that, all internal surfaces are processed by hydrophobic and antifungal composition.
Work on the laying of thermal insulation is usually carried out according to the principle from top to bottom. We will analyze all the steps in more detail.
Heat ceiling
Technology depends on the type of insulation, trim, etc. In general terms, the instructions for laying looks like this:
- We collect the crate. For its manufacture we take the bar or metal profile. The latter is most often chosen under the subsequent installation of plasterboard. Laminated to the ceiling around the perimeter. Then we lay the timber step 0.6 m.
- Checking the horizontal. We take the level and determine the plane. It must be exhibited very precisely. Otherwise, the ceiling will be uneven. Found shortcomings correct.
- Crow heat insulator. It can be rolled or slab. In any case, cut off the fragments so that they are 3-4 mm more than the doom. So the material will fall tightly, without cold bridges. It will be better to hold in the design.
- We put insulation in place. You can additionally fasten the plates with suitable glue. If the gaps were formed, carefully blow their mounting foam.
Then you can put the foam layer with a foil side down. So it will reflect heat waves back. After that, they start the installation of the finish. This is only one of the possible laying of heat insulation.
For solid slabs, a slightly different technique is applied. Plates stick to the base with special glue. It is applied point in the corners and the center. After sticking, we carry out additional fixation of plates with fungi dowels. And then fasten the foam. We put it with a foil layer down, the joints are sicking with scotch.
On top of the insulation, we collect a crate of metal products or bars, to which the finishing finish will continue.
Isolation of walls
One of the easiest options will be the insulation of the loggia of the penplex. These are moisture-resistant plates with low thermal conductivity. High density and low weight significantly facilitate their laying. You can choose any other suitable material. Hard plates are mounted without a crate, but it is most often put. We offer step-by-step instructions of the process.
- We are placed and fixed to the base thin foil polyethylene. It will perform two functions at once: it will serve as an additional waterproofing and will reflect the thermal rays, not letting them leave the room. The foil layer must "look" inside.
- We put the crate of wooden bars or metal profile. The step of the lamellas is not 60-70 cm. We try to choose the value, multiple width of the insulation.
- Crow insulation. Cut the details slightly more cells of the crates so that they are tightly in it.
- We put insulation in cells. All the resulting gaps are stating the mounting foam. The opposite side of the metal profile, where there are emptiness, we also scatter. Otherwise, the cold bridges will remain, which will lead to the formation of condensate and gradual deterioration of isolation.
- We put parosolation. This is a thin film with fine holes. We give her joints with scotch. Fix the membrane with brackets.
After that, you can start decorative trim. The walls and ceiling are mounted wooden or metal cable to which plastic panels or lining. As an finishing finish, you can use wallpaper or paint. In this case, additional work will be required. Moisture-resistant drywall sheets fix the crate. They are primed, putty, align and already after glue wallpaper or paint.
Considering that the simple fastening of vaporizolation is not secure enough, the dowels of "fungi" are additionally installed. So called fasteners with wide hats. They need five pieces for each slab: in the corners and to the center.
The insulation is closed by a steampower. To do this, it is recommended to use vapor insulating films or foil foam polyethylene. It will work as steam, hydro and additional thermal insulation. Foil side unfolds inside the room.
Vaporizolation is fixed with polyurethane adhesive or two-way tape. The seams between the beams of vapor insulation and joints with structures are sampled with a metallized scotch. The finishing decor is mounted on top.
Loggia
Any heat insulator is selected, sometimes used clay. This is a bulk material with a relatively low weight. It takes a lot, so it is better to choose another solution for balconies in old houses. The load on the stove may be too big. Installation of any insulator is made between lags. This is done like this:
- Before mounting the plates, all holes and cracks seal by mounting foam, and then align the surface, for example, using self-leveling cement-sand mixtures. If there is a risk of water penetration through the "cake" of the floor, then you can apply a layer of coating waterproofing onto a concrete slab before alignment (on a height of 300 mm) layer of coating waterproofing (on cement basis, etc.).
- Mount the layer of waterproofing. You can choose a special mastic or to put the film. In any case, it is especially carefully insulated with the shakes of the floor and walls. The joints of the bands are properly laying the bracket and fix the scotch.
- Let's put lagows. Wood bars cut down the size, put on the base. Be sure to align the top edge of each part by level. Otherwise, the floor will be with irregularities. Fix the lags to the base with metal corners or in any other way.
- The heat insulator is cut, if necessary. We put in the cells between lags. Compact the coating so that there is no emptiness. The slots can be used.
- Place a layer of vaporizolation. This is a thin film with fine holes. We give her joints with scotch. Fix the membrane with brackets.
- Flooring the rough floor. We screw it up to lags by self-draws.
After that, you can finish the insulated room. So that everything was clear, we suggest watching a video about the insulation of a loggia with your own hands.
It is much easier and faster to insulate the design of polyurethane foam or eco-art. They are evenly sprayed onto all surfaces. Form a dense seamless insulating coating. Considering the size of the room, the whole process is literally a few minutes. Unfortunately, it is impossible to perform work with your own hands. Special equipment required. Therefore, such insulation may be too expensive.