
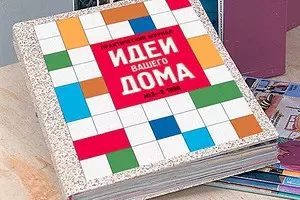
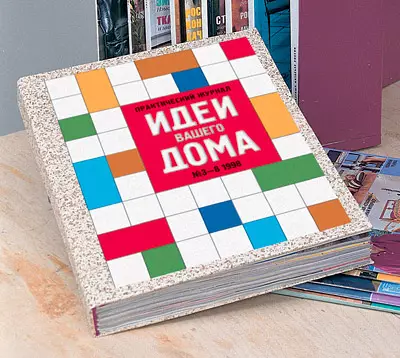
Basics of binding skills on the example of binding to the semi-annual set of "ideas of your home".
Do you need much for this?
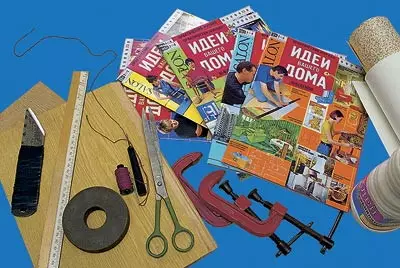
As a gauze, a non-sterile gauze bandage of about 15 cm is usually used. The braid must be necessarily cotton, since the synthetic glued will not succeed. And finally, a few words about binding material. It should be not only durable, easily adhesive, but also within the reasonable limits of decorative. Special binding paper is for sale "Make Self", which can be used in most cases with success. More durable bindings are obtained from upholstered material for doors, skin substitutes and skin actually. True, their decorative properties are very limited. For binding of magazines, you can use a piece of durable waterproof wallpapers suitable for color and drawing to the total color of the room.
In addition to the tools that are available in almost any house - scissors, sewn, ruler, needles with a wide ear, it will have to get a few special tools. First of all, it is a cutter or a capable knife from a calena steel, with a wide blade and one-sided sharpening. For him, a grinding stone will be needed, because the cutter is very quickly stupid, and in the work it should always be sharp as a razor. When buying clamps should be borne in mind that than they are more powerful, the better. In love, the capture must be at least 7-8 cm. You will need two more press plates from the multi-layer (16mm thick) plywood, durable plastic or metal. Other linear dimensions of the plates can be arbitrary, but it is desirable that their width is not less than 23cm, and the length is more than 30 cm. Naturally, it will be necessary either a special table for work, which is spoiled coverage of which will not cause a family scandal, or (worst option) a piece of organity with dimensions of 7070cm as a working coating on the table.
A bristle bristle for glue will be useful (better flat), but since it will constantly push, then the bank with water in which it needs to be kept. This brush can also be applied and rather thin glue bands, and quickly coat with glue relatively large surface.

First sew and glue
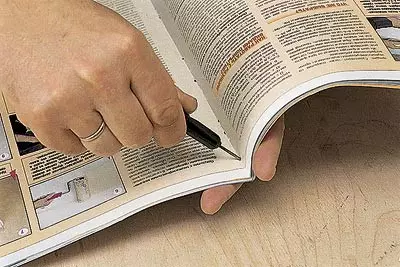
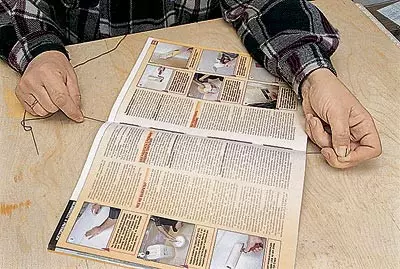
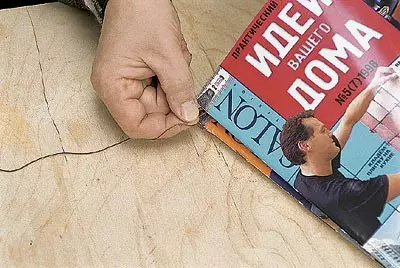
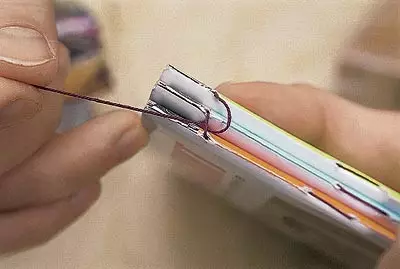
Magazines have a stack on the table (the first number is below) so that they are easy to get their right hand. The top (N6 / 8) is placed in front of them to the left and disclosed in the middle. Metal brackets are inflicted and removed, trying not to shift sheets relative to each other. Where there were brackets, four holes remain. In addition, four more are made to them with a sharp selection: one at a distance of 2 cm from each edge of the root and two more closer to the center at a distance of 2-3cm from each other.
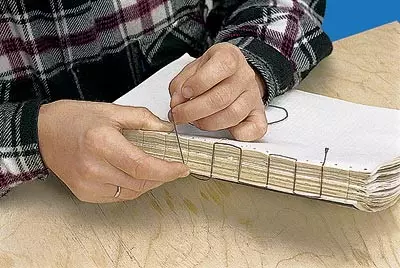
You begin to flash the magazine from the bottom hole (neighbor to you), from the root side. Stretching almost all the thread after the needle through the first hole, part of it is about 5-6 cm ("tail") leave "outside." Sequentially flashing each hole and tighten the thread every time, holding the "tail". After pulling the threads through the last hole, it should be "outside." Close magazine.
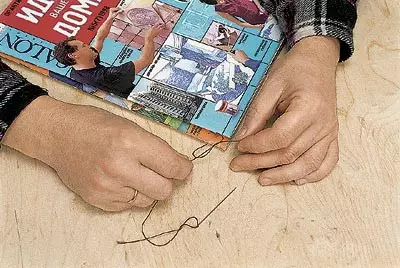
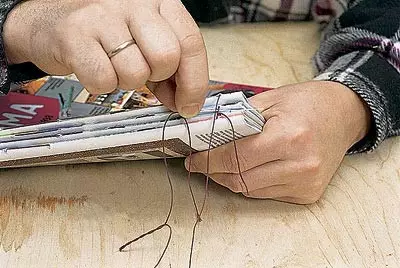
The next magazine is prepared for flashing in the same way as the previous one, put it on top of the facial side already stitched up. At the same time, it is desirable that the extreme holes puuded with a selection in different magazines turned out to be at the same distance from the edges of the root. The needle is still inserted from the outside root, but now, starting from the upper hole (far from you). When the second magazine turns out to be completely stitched, it is closed and, holding a thread from both ends at the same time, stretch it, and then tie up a simple double knot.
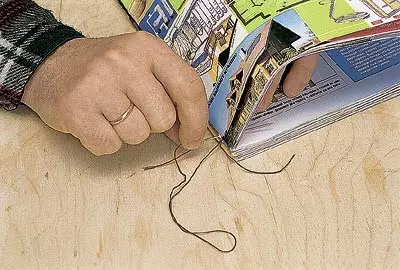
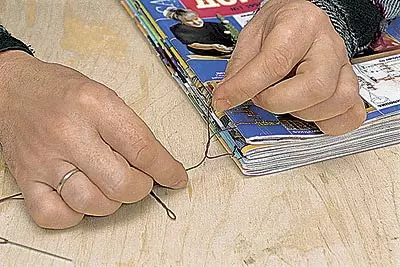
The third magazine is firmware, like the bottom, starting from the bottom edge. But before inserting the needle into the upper hole of the next (fourth time) of the magazine, it is passed under the thread connecting the extreme upper holes of the first two magazines, and then insert the fourth to the extreme hole. It should be noted that the thread next to the needle is advisable to tighten every time on the completion of the firmware of the next magazine. I stitched the fourth magazine, do not forget before insert the needle to the bottom hole of the fifth, skip it under the thread connecting the extreme lower holes of the second and third. Finishing to flash the sixth magazine (in fact, N1 / 3), the thread is finally stretched, the needle is passed under the thread connecting the extreme holes of the two previous journals, and twice tie on it with a simple knot.
For the manufacture of forboats, use enough tight paper. It can be the so-called halfvatman, and cooled paper. The sheet must have a suitable dimensions (more than two sizes of the width of the first page of the magazine cover). The front and rear beads are equal in size. To do not "break down" during operation, it follows the fibers along the fibers. Their direction is determined by bending the leaf by springing hand moving. If you do not feel resistance, bend. On a folded twice, the sheet of paper impose a magazine, align the fibe of the sheet and the root of the magazine, mark the contour of the magazine on paper and with the help of a ruler and the cutter are crashed.
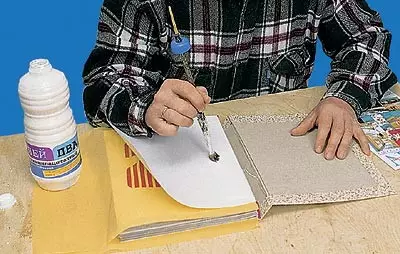
One of the beads are glued on top of the first page of the cover N1, and the second to the opposite side, over the fourth page of the cover N6. At the same time, glue using tassels are applied by a narrow strip from the side of the bending of the mouse, which it is then applied to the cover of the magazine. The root of the magazine and the bend line of the mow, as well as their trims align and pressed all over the strip of gluing. Similarly glued the second forzatc.
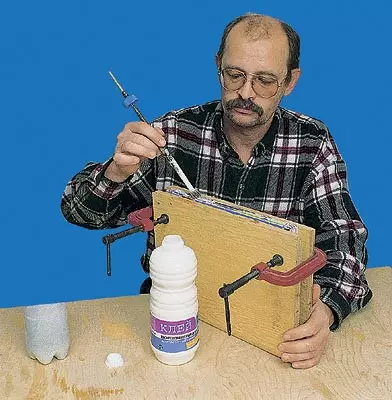
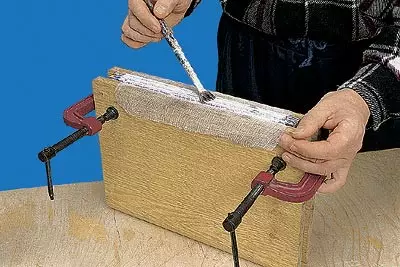
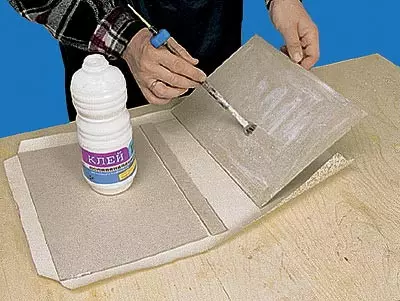
After that, the stitched magazines align on the edge, tapping the entire block alternately, then another end about the table. One of the press plates is covered with a sheet of polyethylene (so that the paper does not glue with the material of the press plate). "Brick" is placed on it so that the roots of all magazines are in the same plane with any of the widespread plates. On top of the magazine block, another sheet of polyethylene and the second plate are placed in the same way. The resulting "sandwich" is fixed with two clamps by narrow edges of the plates. In this form, he needs to dry for several hours. But before sending a "sandwich" on drying, you need to go to the tassel with a tassel common root "brick". Another wet root impose and smash a rectangular piece of gauze. To the upper and lower edges of the root, it should not reach 2-3cm, and at the same time have the letters of centimeters of the P5 width each. When it is not necessary to resume trims or do it is inappropriate (as in the case of our magazine), you can immediately glue the surface to the top and bottom edges for a piece of braid. The width of each piece should be equal to the "brick" thickness.
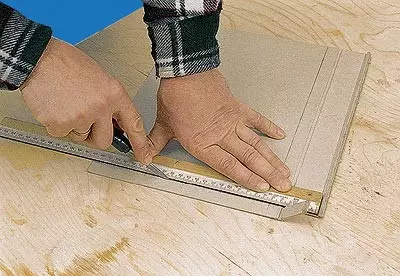
Saying that it is not worth making a new edge for the semi-annual set of "ideas of your home", I mean two points: first, this does not allow this log design, because it has practically no "empty" fields; Secondly, the paper is quite dense and certainly did not have time to fasten down the corners, but a slightly obliquely typographic section of each journal on the side opposite to the root, allow you to quickly find the necessary number. Always, if you still consider the resumption of crops, you will have to have a listed tool in the listed tools to have another 30-40 cm long. The dried magazine block before this procedure is stacked by the front side up and outline in the top, lower and right edges. Floascape line (no less than 5mm from existing trimges). Brick shift the right edge to the edge of the table and stacked the corner. Single press plate and clamps corner fixed and then start working as a cutter. It should be borne in mind that the cutter must be kept strictly perpendicular to the surface, pressing the blade to the vertical plane of the corner. Cut better, capturing one or two sheets, not "burning" deep into. After one and a half dozen moving with a cutter, it must be corrected on the grinding stone. Yvse-Taki is a smooth edge, most likely will not work: this work is quite tedious and requires special skill.
Similarly, the "brick" is treated in the upper and lower cutting, and only after that it is glued along the edges of its root pieces.
Then cut and glue
While the "brick" dries, you can do the manufacturer. Make it from one sheet of binding material and three pieces of cardboard. It is necessary to admit that the root of such a cover is not too racks and perhaps over time the binding will have to redo. However, a more reliable cover of the cover of three fragments, in which matterium, leatherette or leather, less aesthetic is on the root.
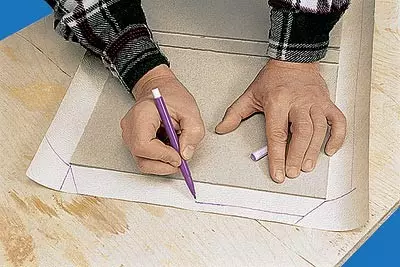
First of all, it is necessary to remove the size of the resulting block. For the first six numbers of the 1998th "ideas ..." These are the following values: Width - 219mm, length - 295mm and thickness - 25mm. There are three pieces of cardboard with them: two are the same (width - 221mm, that is, 2mm more brick width; length - 299mm, that is, 4mm larger "brick") and one on the root (width - 25mm and length 299mm).
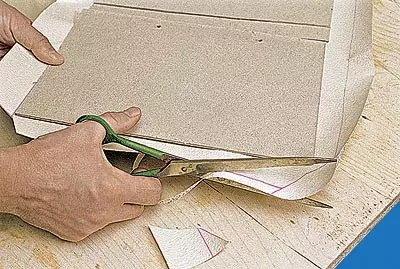
All three pieces are unfolded on the wrong side of the binding material so that the lower edges of each are on the same line, and narrow in the center. The distance between the cards should be 5mm. Each of the pieces will be powered by a pencil, and to the three rectangles received on paper with four sides of the strip of bend. The overall figure is cut out at an extreme outer line.
Subsequent operations are fulfilled in stages, if practical experience is still not enough. In this case, the glue is applied to a brush to the cardboard over the entire area twice, since the first layer is quickly absorbed.
- Stick pieces of cardboard into place (on the appropriate rectangles).
- Alternately bend and stick strips of bend.
- Remove from the press "Brick", visually check how logs are oriented in it, wedging with glue "wings" and tightly press them to the appropriate sides of the block on top of the forges.
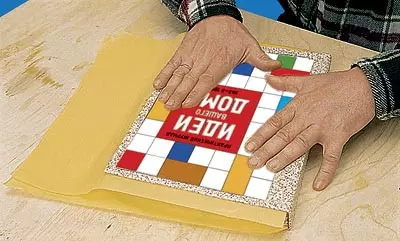
- Apply glue to the right wide piece of cardboard cover and gently laid the block on it. At the same time, the corresponding allowance should be between the bells and cardboard, the former for three parties must retreat from the corresponding edge of the cover for a couple of millimeters, and the root of "brick" must coincide with the edge of the lower cardboard facing the cover of the cover or a couple of millimeters to perform over it. This is a very responsible operation, the correction of which will require the alteration of the Floor.
- Now the glue is applied to the left piece of the cover of the cover and also gently pressed it to the uppermost driver.
- Immediately after the last stage between the cover and the free sheet of each mouse, they are laid on a piece of polyethylene, the edges of which are several centimeters from all three parties of the binding. Otherwise, the cover can stick to several pages.

And finally, dry everything that is cut, sewn, and glued up ...
The last procedure is the least laborious, but the longest. The binding is placed between press plates and, if possible, evenly clamp clamps. In a videos, he must be for several days. Those who hurry and remove the magazines too early will soon have to face troubles: the mousets or binding material can be lagging behind the cardboard and form a "ripple" or "bubbles". The binding is unlikely at least two to four days depending on temperature and humidity indoors.
In conclusion, you can talk about binding for "lazy". In fact, it is much less durable and used mainly in cases where manuscripts are intertwined or some other unpaired sheets. They are aligned in the left and lower edges, clamping between the press plates and are inscribed on the left edge (root) of 10-15 places with a metal with a depth of 3-5mm. The spine is abundantly lubricated with glue and in the slot "snake" insert the thread from the edge to the edge and back. In this case, it is impossible to excessively pull the thread, otherwise, with the subsequent disclosure of the volume on any page, the thread simply jumps and the sheets will start gradually crumble. After the "gasket", the threads are punched again, and all subsequent works on the cloud of "brick" in the cover are no different from those already described.
Now wait for you when you dry up the set of magazines, get it out, open up and look at the familiar pages. If it does not turn out, that part of the magazines is woven upside down, part of the root is not in the wrong direction, but all together are not in order, consider that your dedication to the rebooters took place!