Brief characteristics of laminate, styling and finishing technology, parquet care and restoration of small damage.
There is a huge number of people who want to see only natural materials in their home. In our opinion, this desire is not always justified. After all, progress does not stand still. Modern technologies allow you to create imitation, largely superior to the original. Such and laminated parquet
Laminated parquet, or laminate, by 1.5-7mm thinner, its base (or carrier panel) is usually made of high or medium density water-fibrous material (chipboard or DVP). Under it is a lining of specially treated kraft paper, which fixes the base, not letting it swear and brew. On the carrier panel lies with a decorative film, which determines the color and pattern of the floor, it is saturated with melamine (synthetic) resin and is covered with wear-resistant transparent synthetic varnish. That is why the laminate has many advantages: resistance to mechanical exposure, ultraviolet rays, spots, chemical compositions, even to accidentally fallen burning cigarettes.
Laminated parquet, imitating various woody rocks and other materials (granite, marble, etc.), produced in the form of spacecraft 100 (120) 19 (20) cm, packed in packs (one pack of 1.5-2m2 floor) . Manufacturers usually provide a guarantee of 10 (reference to 15) years.
Preparation for work
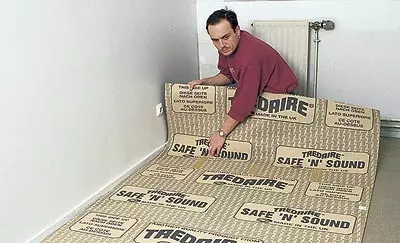
Parquet strips put to the room at least 48 hours before it laying. It can be carried out directly to an existing soft coating (carpet with a short pile, etc.), provided that it is quite smooth. If the base is solid, for example, from concrete or ceramic tile, it is necessary to put an elastic substrate for navigating sounds and mitigating beats.The substrate (2-4mm thick) can be made of foamed polyethylene, cork or rubber based on polyester fiber. To prevent the deformation of the substrate due to moisture, it is recommended to be isolated by polyethylene (polyamide) film. Insulating material rolls are rolled perpendicular to the direction of laying laminate.
Installation of slats begins along the wall, and the rows must be focused on the light in the direction of the window so that the seams are not visible. Otherwise, all the irregularities of the floor will be emphasized by lighting. To ensure a gap between the parquet and the wall, special wedges are paved, since the laminate after laying is spreading around the perimeter for about 8mm. The in the afternoon this clearance is closed by a plinth. Furniture can be placed 24 hours after the end of work, this time is necessary to dry the glue. In order not to scratch the floor, felt mugs are stirred on the legs of the furniture.
Accessories for finishing
Parquet manufacturers offer plinths, the same color and painter with parquet. You can also use self-adhesive plinth from laminate or plinth with stucco ornaments and rounded edges. Inside, where the installation of the plinth is difficult (at the bottom of the door box, in the opening of the sliding door, etc.), the parquet is glued with acrylic mastic selected in color. The gap between the parquet of adjacent rooms is closed with a profile metal strip-"boost" in the form of the letter "C" to compensate for the level difference between laminate planks and bare floors. Using special profile plates, you can close the edges of the stairs on the stairs.
Care and repair
The laminated parquet can be freely lay on the floor heated, but in the bathroom and in the kitchen it is better not to put it because of too much humidity.Caring for such a floor is very simple: it is enough to vacuum and wipe off with a damp cloth. Alluring the need to remove stains from nail polish or marker alcohol or acetone. With the help of a special dye, hardener and acetone, it is possible to make smallest surface damage, and if you have a manual circular saw, which allows you to produce longitudinal cuts, is to replace a lagged or failed bar.
Required tools
- roulette (preferably with marking on the inside);
- Raysmus (measuring device from a tree or metal with which parallel lines are placed);
- TRANSPORT AND FASTABLE COLLECTER - for marking lines dug off;
- hacksaw with small teeth;
- 1-2 chisels on wood - for cutting planks;
- rubber cizyanka;
- rasp;
- hammer (for example, carpenter);
- A set for laying a laminate, including wedges of different thickness, gasket and fixture for laying and tightening planks.
| Laying of laminate requires a shock-absorbing substrate, softening sounds and beats. It must be assumed perpendicular to the direction of the flooring of the parquet. |
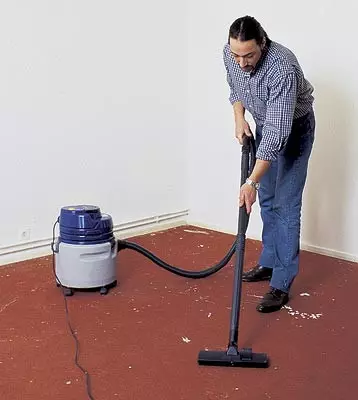
| An excellent substrate can serve as a short pile carpet. It should be thoroughly cleaned from solid debris or particles capable of creating irregularities on the laminate floor. |
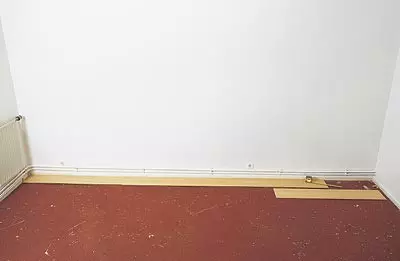
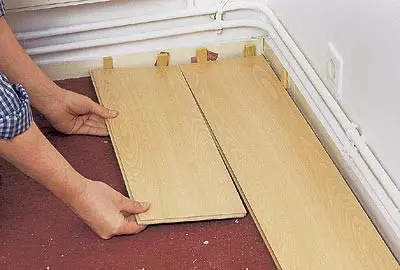
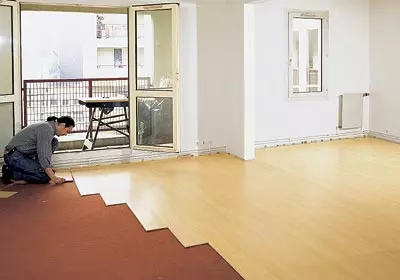
| Along the wall from which you start work, put the first row of planks in the direction of falling daylight, inserting wedges (2-3 pcs.) Between the parquet and the wall to provide the gap. Stacking is not necessary to lead immediately along the entire wall of the room. |
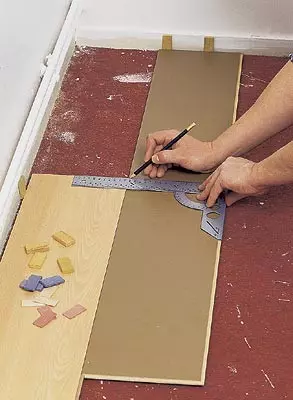
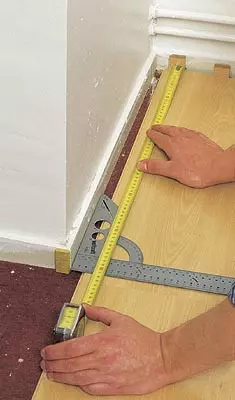
| To do not measure the length of the last planner in a series, attach it to the previous and read the cutting line on its backward side with the help of the coce. |
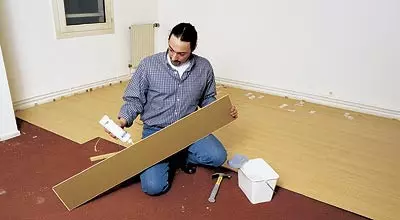
| Load glue the end groovers and insert it into the crest already installed. An exemplary consumption of glue is 0.5 liters per 10m2 laminate. |
| Press the slats, located close to the wall, allows a special device. The lower surface of this tool is equipped with felt pads so as not to scratch the coating. |
| Begin to lay out each subsequent row from trimming the plank remaining from the previous row. Thus, the locations of the joints will be shifted, which is impossible with the planets of the same length. |
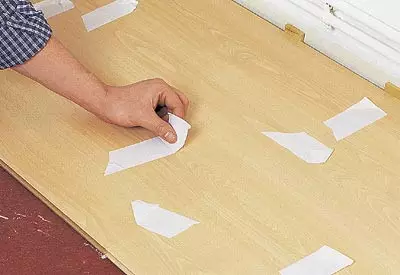
| When the first two rows are laid, secure their joints in several places with a wide adhesive tape so that the planks are not shifted. |
| It is much more convenient to squint the groove of the groovers to lay the groove of the grooves than on the already installed and in contact with the floor. We are the advantage of laying a laminate to the crest. |
| To press the planks to each other with longitudinal edges, attach a wooden slaughter to them and knock on it a sufficiently massive hammer. You can also use the cropping of laminate and rubber Cyans. |
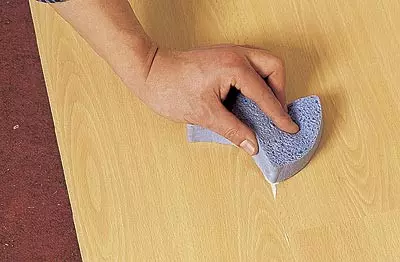
| Surplus glue from the surface of the parquet immediately remove with a cloth or a wet sponge. |
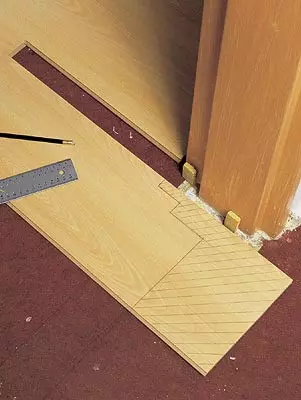
| If you need to cut off part of the plank of an incorrect laying form in the wall or, as shown in the figure, in the separation partition, measure the length and width of the desired laminate segment, taking into account the gap between the wall and the bar. |
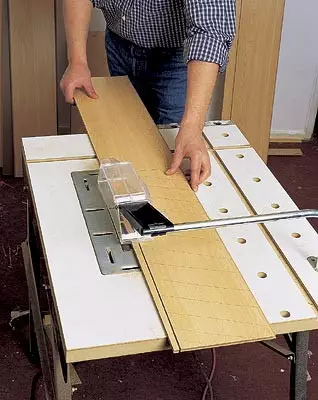
| Cut the bar on the markup, better mounted on the bed with a circular saw, stationary or portable. If it is impossible, take advantage of hand-hacksaw with small teeth. |
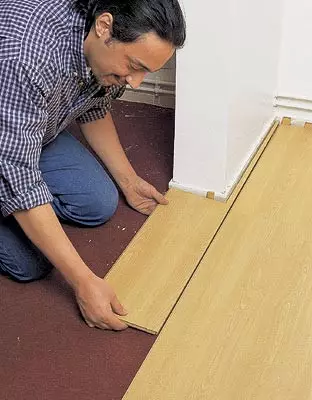
| I cut off, attach it to the longitudinal side to the laid row, insert the comb in the groove and shift to the stop, pre-laying the wedge to comply with the gap. |
| On the other hand, the split partitions, the bar are stacked in the same way. Each latter is pumped individually in the row, since the walls are rarely absolutely perpendicular. |
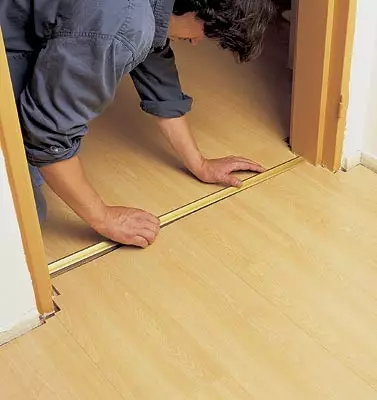
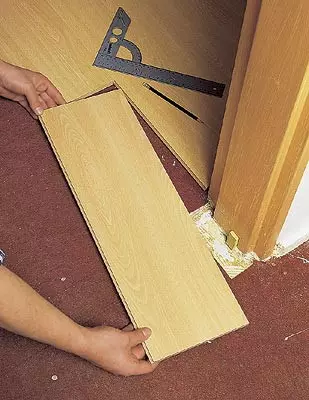
| To put parquet near the door frame, you need to cut down the lower part of the shoals in the height of the laminate, or to make sure the corresponding line contour. |
| Apply the contour of the cut, taking into account the gaps between the bar and the joy, can be using a vehicle or a cardboard template. |
| If necessary, pick up the end of the small rashpil. If the error is not enough enough, take another bar and drink a new cut. |


Finish
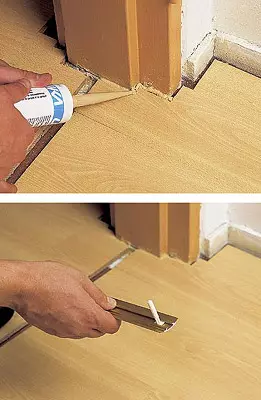
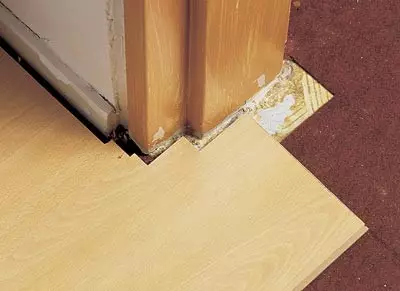
| Wedges are removed in a day after the flooring of the parquet. The space between the door jams and the straps is filled with acrylic mastic, and in the doorway two adjacent rooms, parquet is connected by a metal spawning. |
| Attention! The plinth is the element purely decorative and should not be pressed to the parquet. Pre-route between the plinth and laminate with dense paper, and even better, the cardboard that is removed after fixing the plinth with nails without hats. |