
Replacing the old asbestos-cement roof (slate) on a more durable and aesthetic flexible tile takes several days. It is important to know the entire sequence of the stages of dismantling the old coating and the installation of a new roof before starting work. In this article we will explain why and how to replace the old slate on flexible tile.
Traditionally, slate is used in low construction. Despite the budget of the material, the material has a number of significant drawbacks:
- Slate contains asbestos, and this component can bring harm to a person in the form of asbestos dust that rises during its processing.
- Because of the large weight of slate, significant physical efforts are required when installing.
- Slate is relatively unstable to moisture. Such a roof like a sponge absorbs moisture. A few years, due to excessive moisture, moss can be generous and various lichens.
- Insufficient aesthetics. For difficult architectural projects and design solutions, slate is not suitable.
- Spike fragility. During the installation of slate on the rafter, it is necessary to nail the sheets with nails. From a nail strike, chip and cracks are often formed in slate.
The replacement of physically and morally obsolete slate to most of the owners of country houses and cottages is extremely expensive and a long event. Therefore, many prefer to pull the roof with renovation to the latter, steering the local repairs of the most problematic sites.
However, such a lamination of holes rarely eliminates leaks and other problems that cut off their roof, especially if it was originally built with errors and technology violations. In this case, local coating repair, without eliminating the causes of damage to the roof, - the money thrown into the wind. Renovation of slate on flexible tile The process is simple and does not require special skills. The main thing is to comply with the stratitude of the work and recommendations of the manufacturer of flexible tile.
Stage 1. Dismantling of an old slate
To remove slate with the roof, a nail-cutter, hammer or scrap. Asbestos-cement sheets can split and dust. Disassembly slate begins on top down and goes ladder diagonally. Dismantling work must be carried out carefully, not advancing on the breakthranted sheets, because They can slip and fall. Old roofing should be dismantled first from one slope, then from the other. If it is raining, one open roofing slope is easier to cover the film, protecting the attic room from water.

Photo: Tehtonol
Stage 2. Update (strengthening) of the rafter system
Under the old slate there are rafting structures. If before the roof flowed, they may be damaged by fungus and mold. It is important before installing the roofing system to carefully examine their integrity, evaluate damage, the state of boards, layers and mauerlatov. Perhaps for the new system, the step of the rafter will be insufficient. In this case, you need to build a new carrier system.

Photo: Tehtonol
Stage 3. Installation of a solid base
After completion of the work with a rafter design and the local replacement of rotten boards, you can move to the laying of the crate and over it with a solid base from the OSP. It is important to leave the gaps between OSP plates of at least 3 mm to compensate for the linear expansion of the material under the influence of natural natural factors: air humidity and temperature.
If a constructive solution assumes the arrangement of warm attic, the insulation is placed before assessing the OSP plates and only then the solid base from the OSP plates is mounted.

Photo: Tehtonol
Stage 4. Installation of eaves
Now that the base of the flexible tile is ready, it is necessary to strengthen the backbone Sve. For this purpose, metal eaves are used, which are stacked by the edge on the edge of a solid base. The mounting of the slats occurs in a chess manner with the help of roofing nails, the backstage of one plank should be 3-5 cm.

Photo: Tehtonol
Stage 5. Installation of waterproofing
Next, the waterproofing device begins. It is recommended to use Anderep lining carpets. Waterproofing is placed all over the surface of the roof. In difficult places: joints, adjoins, cornice, endowers - mounted self-adhesive lining carpet Anderep Ultra. On the remaining surface of the OSP, the lining carpet of mechanical fixation is attached.
Installation of the canvases is lowered up with an overlap 10 cm in the longitudinal direction. The places of the allen are missing by Tekhtonikol mastic on a width of 8-10 cm.

Photo: Tehtonol
If the roof of the house has an internal angle (endowa), its waterproofing can be performed by the process of the cut. In the first case along the axis of endanda, the omene carpet of TechnoNikol is mounted over the Anderep lining carpet. In the perimeter of the back side, it is launched by bitumen mastic on a width of 10 cm and is nailed with roofing nails in 20-25 cm increments.
After completing the installation of the lining carpet, the end slats are installed to enhance the front-bottom sink. They are fastened with roofing nails over the lining layer with the overtrib of one plank to another 3-5 cm.
Stage 6. Installation of the starting strip
On the prepared surface begins mounting from the starting strip. On long rods, the laying of the first row is recommended from the center of the skate. If the roof is not big, you can start from the front. Mounted tiles with diagonal stripes. The second row is placed with the offset to the left or right on 15-85 cm (approximately half a petal). The third row should also shift at 15-85 cm relative to the tiles of the second row.

Photo: Tehtonol
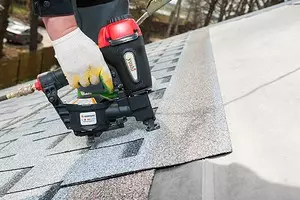
Stage 7. Installation of flexible tiles
Each shingle of the tile is nailed to the base with the usual hammer or with the help of a pneumatic nail pistol. Special tool allows you to increase the mounting speed several times. If the roofing rod does not exceed 45%, the tile is nailed for 5 nails, if it is greater - 8 nails are required. Recall that the flexible tile can be mounted on the roofing rods from 12 to 90 degrees.

Photo: Tehtonol
The arrangement of nails depends on the series and the shape of the tile (refer to the manufacturer's instructions), but it remains unchanged, the fact that only special galvanized roofing nails with a wide hat should be used for installation. If the roof is mounted on ordinary nails, then the tile trunks can fly away during a strong wind.
Stage 8. Installation of the skate aerator
When applying the roofs of the roof, the ordinary tile cuts into a slot of 0.5 cm wide between coatings of adjacent rods. Roofing aerators are installed on the skate. Roofing aerators are then closed with skate-eaves.

Photo: Tehtonol
Replacing asbestos-cement slate on flexible tile takes a little time. The technology of dismantling the old coating and installing the new roofing system is quite simple and does not require special preparation for renovation from slate on flexible tile.